Arweave GraphQL Explorer
When uploading data to Arweave using Bundlr, you have an option to tag that data with metadata. This is generally used to do things like set the Content-Type tag to help browsers render the data, or to set a custom App-Name tag to help you organize your uploads.
What's really cool though, is you can use GraphQL to query Arweave using those tags.
In this tutorial, we're going to build a tool to show n most recent PNGs uploaded to Arweave. You'll learn about GraphQL, what it is, and how to use with JavaScript / TypeScript. While we're going to focus specifically on querying for the Content-Type tag, you could also do things like query based on block id, ower, recipient, or transaction id. .
While this is a pretty simple tutorial meant to teach the basics of GraphQL and how to use it to query Arweave, the concepts you learn are applicable to lots of other projects. This will be of special interest to people who want to build on Lens Protocol as they use GraphQL when reading and writing post data.
This tutorial assumes you have basic knowledge of React, HTML and Tailwind. The goal of the tutorial is to build on that basic knowledge and teach you how to get up and running with GraphQL.
All the code for this project can be found on GitHub.
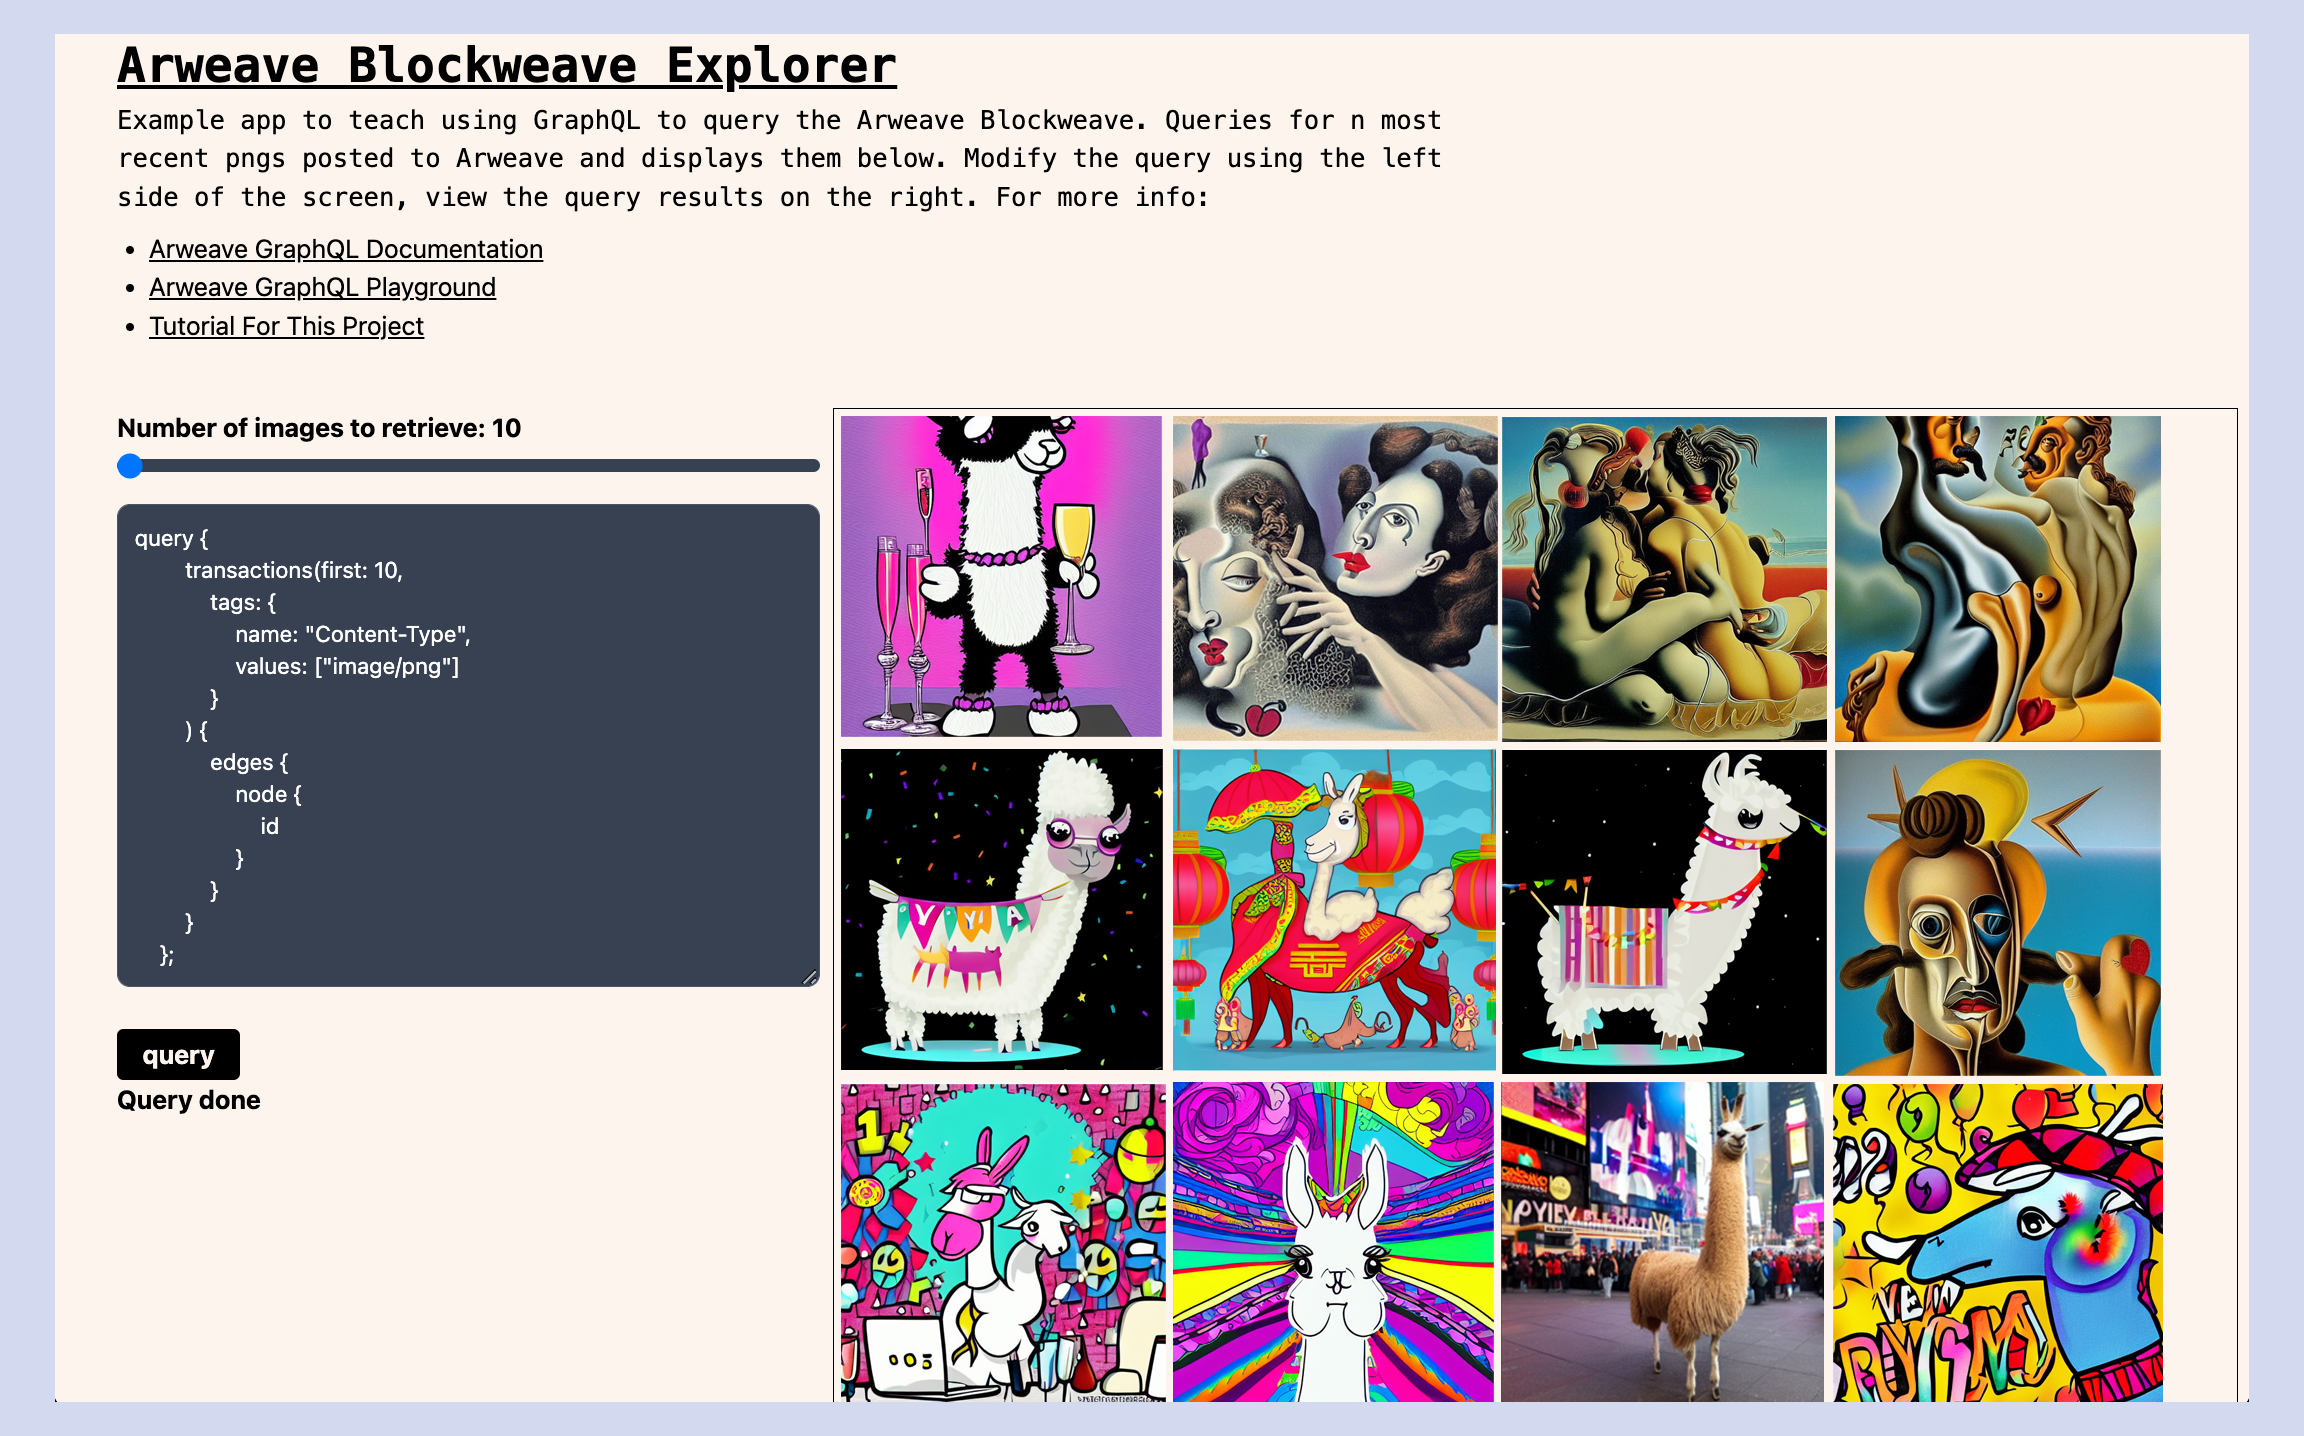
Here's a peek at what we're going to build.
What Is GraphQL
GraphQL is a query language for APIs, it's used to search for, retrieve, update and write information. It's different from JavaScript which is a full-blown programming language where you can do just about anything.
If you have experience querying APIs directly in a REST architecture, or making database queries with SQL, then you're familiar with query languages. GraphQL takes a different approach though, one that makes a lot of sense when working with blockchains. With GraphQL you're able to optimize your interactions by making multiple requests in a single query call. You're further able to optimize by requesting the exact data you want out. You don't need to over-fetch data and waste bandwidth transferring data you don't need.
Query, Mutation, Subscription
If you're going to grok GraphQL, you'll need to start with the basics: queries, mutations and subscriptions.
Query: A query is the most common operation in GraphQL. It allows the client to retrieve specific data from the server by specifying the fields they need. Queries are used to fetch data and are read-only operations.
Subscription: A subscription is used to receive real-time updates from the server. It allows the client to subscribe to specific events or data changes, and receive updates as soon as they happen.
Mutation: A mutation is used to create, update, or delete data on the server. It allows the client to send data to the server and make changes to the data stored there. Mutations are write operations, and they return the updated data once the operation is completed.
So ... to put that in simple langauge. Queries get data out, subscriptions are like queries that update automatically, and muations put data in. This tutorial focuses specifically on queries.
Anatomy Of Query
When creating a query using GraphQL, you have two main tasks. First specify your filter criteria, the data points you want to search for. Then you specify the structure of the result, the data you want out.
query {<schema type>( <what you're searching for> ) { <what you want out > }
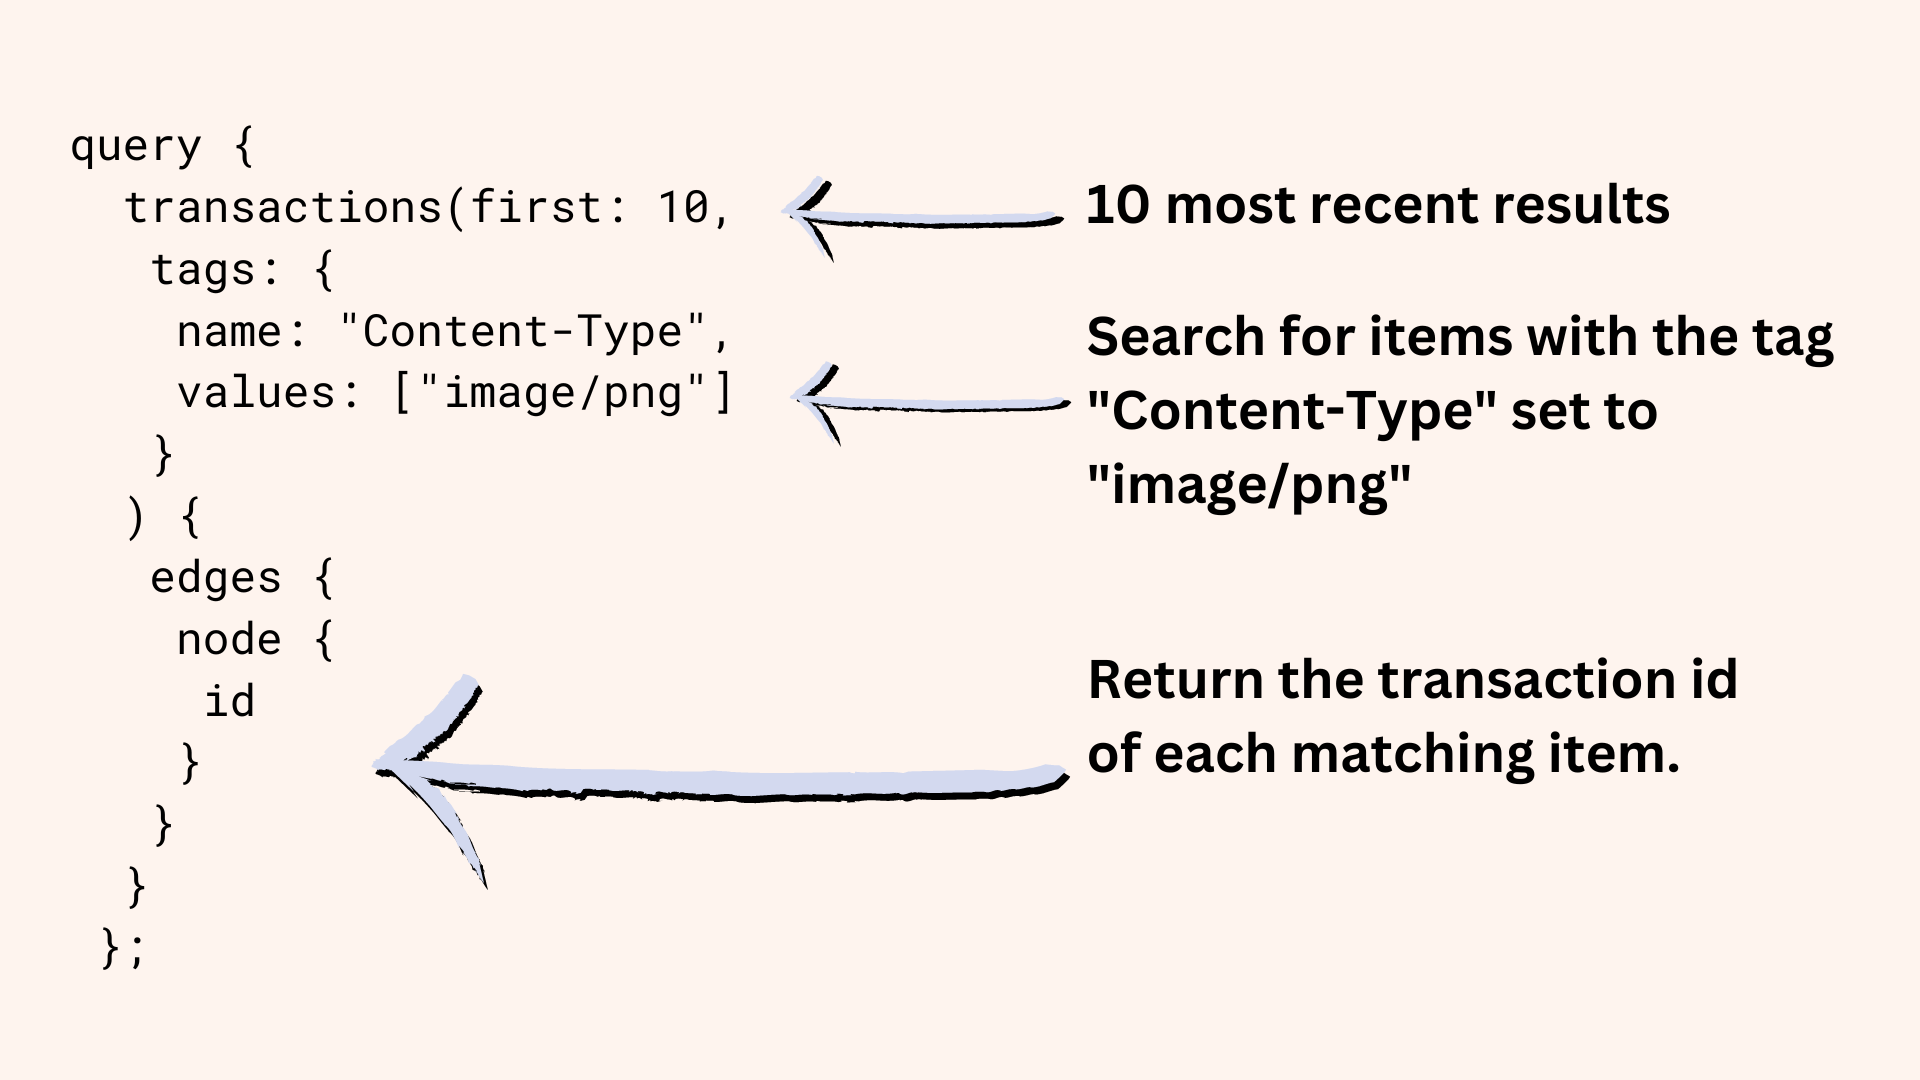
Let's break that down and look at the query we're going to build for this project.
We start out by specifying that we're creating a query (not a subscription or a mutation), then we indicate that we only want the 10 most recent results. From there we filter (search) using the tag Content-Type = image/png and finally we say we only need the transaction id back. When working with GraphQL you can ask for any number of fields back, but to reduce overhead you should make your queries as lean as possible. When working with Arweave, the transaction id combines with https://arweave.net to form a URL that can be used to download the associated data. In our case, we're going to be displaying all the PNGs in an HTML page, which means all we need is the transaction id.
When building and testing your own queries, you can test them in the Arweave GraphQL playground.
Installation And Setup
Cool, cool, cool. Ready to code?
Create a new directory for your project, cd into it, and create your React project:
mkdir tags-graphql
cd tags-graphql
npx create-react-app .
To make using GraphQL easier, we'll use the Apollo GraphQL client libraries.
npm install @apollo/react-hooks apollo-client graphql graphql-tag apollo-cache-inmemory apollo-link-ws
And I'm a big fan of Tailwind, so we'll use that for UI styling.
npm install -D tailwindcss
npx tailwindcss init
Now finish up the Tailwind installation by changing your tailwind.config.js file to be as follows.
/** @type {import('tailwindcss').Config} */module.exports = { content: ["./src/**/*.{js,jsx,ts,tsx}"], theme: { extend: {}, }, plugins: [],};And modify your index.css file as follows.
@tailwind base;@tailwind components;@tailwind utilities;html { width: 100%; height: 100%; background-color: #fef4ee;}UseProvider
When working with the Apollo GraphQL libraries, one of the first things you do is create an ApolloClient object and point that at your desired endpoint. The Arweave endpoint we'll be using is https://arweave.dev/graphql and the code to create the client is:
const client = new ApolloClient({ uri: "https://arweave.dev/graphql", cache: new InMemoryCache(),});There are two ways to deal with creating a client. You can instantiate a new client object local to each component that needs it or create a global shared client. When working with React, best practice is to instantiate the object in your index.js or App.js file and then make it globally available using the ApolloProvider tag. For a small project like ours, it probably doesn't matter which way you go about it ... but since we're aiming to create a project that could easily be expanded into something larger, we'll use the ApolloProvider pattern.
Modify your index.js page as follows.
import React from "react";import ReactDOM from "react-dom/client";import "./index.css";import App from "./App";import { ApolloClient, InMemoryCache, ApolloProvider } from "@apollo/client";const client = new ApolloClient({ uri: "https://arweave.dev/graphql", cache: new InMemoryCache(),});const root = ReactDOM.createRoot(document.getElementById("root"));root.render( <ApolloProvider client={client}> <App /> </ApolloProvider>,);By wrapping the <App /> tag with <ApolloProvider> tags, you make the client available to both the <App> component and all of its child components. To obtain a reference to the client in any of child components, simply use this line of code.
const client = useApolloClient();
Query File
As we're working with two different languages in this project (JavaScript and GraphQL), it's good practice to bifurcate your file structure and store all of your GraphQL queries separately from your main JavaScript code. The GraphQL file then exports the queries as constants that can be used by other parts of your application.
The GraphQL you write can either be fixed or dynamic based on variables passed in at runtime.
In your src folder create a new folder titled queries and then in that folder create a file called queries.js.
The two queries below are an extension of what we created above. The first one GET_PNG accepts a variable of type Int called numImages that is used to specify how many images to return.
If you've only used JavaScript before, you may not be used to declaring the type of your variable. JavaScript is what's called dynamically typed, meaning you don't need to declare what type a variable is when creating it. This does make coding rather quick but can lead to confusion and problems down the line. TypeScript was built on top of JavaScript and added a handful of features including the ability to declare variable types. GraphQL, like TypeScript, is a statically typed language. Meaning you have to declare a variable's type when using it.
A full deep-dive into GraphQL types is beyond the scope of this tutorial, but it's worth taking a time to look at one specific subset. Here's a table comparing GraphQL Scaler Types to JavaScript Primitive Types. As my query is specifying a number of images to return, I use the GraphQL Int Scaler Type. Were I to pass in the value of the the Content-Type tag as a variable, I would declare that variable as a String.
| GraphQL Scalar Types | JavaScript Primitive Types |
|---|---|
| String | String |
| Int | Number (Integer) |
| Float | Number (Floating Point) |
| Boolean | Boolean |
| ID | String (or Number) |
The second query, GET_PNG_10, is much simpler as it hardcodes the image limit at 10.
import { gql } from "apollo-boost";// query a variable number of pngsexport const GET_PNG = gql` query GetPNGs($numImages: Int) { transactions( first: $numImages tags: { name: "Content-Type", values: ["image/png"] } ) { edges { node { id } } } }`;// get exactly 10 pngsexport const GET_PNG_10 = gql` query GetPNGs { transactions( first: 10 tags: { name: "Content-Type", values: ["image/png"] } ) { edges { node { id } } } }`;Page Structure
Nice, making progress. Next, modify your App.js file as follows. Notice how on lines 6 and 7, we import the queries declared above. Then on line 19, we have an empty useEffect() function and on line 39 an empty doQuery() function. Take a look at the code first, in the next sections we'll flush out useEffect and doQuery and look at how to run the actual query.
import { useState, useEffect } from "react";import { useApolloClient } from "@apollo/client";import { useQuery } from "@apollo/client";import { GET_PNG } from "./queries/queries.js";import { GET_PNG_10 } from "./queries/queries.js";export default function App() { const [message, setMessage] = useState(""); const [numImages, setNumImages] = useState(10); const [images, setImages] = useState([]); const client = useApolloClient(); // called on page load (component render) const { loading, error, data } = useQuery(GET_PNG_10); // load the initial 10 useEffect(() => {}, data); // this query is used for display purposes only // helps educate the viewer about GraphQl let queryForDisplay = `query { transactions(first: ${numImages}, tags: { name: "Content-Type", values: ["image/png"] } ) { edges { node { id } } } };`; // called when the user clicks "query" const doQuery = async () => {}; return ( <div className="bg-[#FEF4EE] h-screen"> <h1 className="pt-10 pl-10 text-3xl font-mono font-bold underline"> Arweave Blockweave Explorer </h1> <div> <p className="pt-1 pl-10 w-2/3 font-mono"> Example app to teach using GraphQL to query the Arweave Blockweave. Queries for n most recent pngs posted to Arweave and displays them below. Modify the query using the left side of the screen, view the query results on the right. For more info: </p> <ul className="list-disc mt-2 ml-5 pl-10"> <li> <a className="underline" href="https://gql-guide.vercel.app/" target="_blank" > Arweave GraphQL Documentation </a> </li> <li> <a className="underline" href="https://arweave.net/graphql" target="_blank" > Arweave GraphQL Playground </a> </li> <li> <a className="underline" href="https://docs.bundlr.network/tutorials/graphql-explorer" target="_blank" > Tutorial For This Project </a> </li> </ul> </div> <div className="flex flex-row pt-10 pl-10" id="title-area"> <div className="w-1/3" id="query-configurer"> <span className="flex flex-col"> <label className="font-bold"> Number of images to retrieve: {numImages}{" "} </label> <input id="default-range" type="range" min="10" max="100" value={numImages} onChange={(e) => setNumImages(e.target.value)} className="mt-2 w-full h-2 bg-gray-200 rounded-lg appearance-none cursor-pointer dark:bg-gray-700" /> </span> <textarea id="queryForDisplay" rows="14" className="mt-5 p-2.5 w-full text-sm text-gray-900 bg-gray-50 rounded-lg border border-gray-300 focus:ring-blue-500 focus:border-blue-500 dark:bg-gray-700 dark:border-gray-600 dark:placeholder-gray-400 dark:text-white dark:focus:ring-blue-500 dark:focus:border-blue-500" readOnly value={queryForDisplay} ></textarea> <button className="mt-5 bg-black hover:bg-blue-700 text-[#FEF4EE] rounded px-4 py-1 font-bold" onClick={doQuery} > query </button> <p className="font-bold">{message}</p> </div> <div className="flex flex-col"></div> <div className="w-2/3 flex flex-wrap ml-2 mr-2 border border-3 border-black" id="query-results" > {images.map((image, id) => { return ( <a href={image} target="_blank" className="underline" > <img className="mx-1 my-1" width="200" height="200" src={image} key={id} /> </a> ); })} </div> </div> </div> );}useQuery vs client.query()
When working with the Apollo GraphQL client and React, there are two ways to execute a query. Using the useQuery hook and then directly using the client.
useQuery
The useQuery hook is used to query for data needed at the time a component is rendered. It's not designed for queries that change as a result of user input (unless you plan to re-render the component).
To use, simply pass in your query and then once the data variable is available, you're free to use it. I used the useEffect hook and set it to be called every time the data variable changes, this way I know the data is there before I start playing with it.
Once I have the data, I pull out all the transaction ids, combine them with https://arweave.net and push them into an array of URLs that will be used further down the page when rendering the images.
This query will be run whenever the page is loaded and will load the 10 most recent PNGs. This way there is data immediately available to display. The user will then have an option to increase or decrease the number of images shown and re-rerun the query using the client.query() function.
// called on page load (component render)const { loading, error, data } = useQuery(GET_PNG_10);// load the initial 10useEffect(() => { // add an extra check, make sure loading is done if (!loading) { const edges = data.transactions.edges; const allUrls = []; for (let i = 0; i < edges.length; i++) { allUrls.push("https://arweave.net/" + edges[i].node.id); } setImages(allUrls); }}, data);client.query()
When executing a GraphQL query that needs to be triggered as a result of user action, use the query() function exposed by the ApolloClient class. Take a look below at the full doQuery() function, specifically the lines 10-13. I use the query GET_PNG and pass it the numImages variable set in my user interface. Since numImages is declared as an Int in my GraphQL, I use the JavaScript parseInt() function to guarantee the value passed is an Int.
As with earlier, I take the transaction ids returned and create URLs by concatenating them with https://arweave.net/.
const doQuery = async () => { // clear existing images setImages([]); // get new ones try { setMessage("Starting query"); // Call parseInt on the numImages variable, otherwise JS thinks it's a string console.log("Starting query numImages=", numImages); const response = await client.query({ query: GET_PNG, variables: { numImages: parseInt(numImages) }, }); setMessage("Query done"); // pull out the transaction ids to use in img tags const edges = response.data.transactions.edges; const allUrls = []; for (let i = 0; i < edges.length; i++) { allUrls.push("https://arweave.net/" + edges[i].node.id); } setImages(allUrls); } catch (e) { setMessage("Query error ", e); }};Here's the full App.js code block in case you want to see it all as one.
import { useState, useEffect } from "react";
import { useApolloClient } from "@apollo/client";
import { useQuery } from "@apollo/client";

import { GET_PNG } from "./queries/queries.js";
import { GET_PNG_10 } from "./queries/queries.js";

export default function App() {
    const [message, setMessage] = useState("");
    const [numImages, setNumImages] = useState(10);
    const [images, setImages] = useState([]);
    const client = useApolloClient();

    // called on page load (component render)
    const { loading, error, data } = useQuery(GET_PNG_10);

    // load the initial 10
    useEffect(() => {
        if (!loading) {
            const edges = data.transactions.edges;
            const allUrls = [];
            for (let i = 0; i < edges.length; i++) {
                allUrls.push("https://arweave.net/" + edges[i].node.id);
            }
            setImages(allUrls);
        }
    }, data);

    // this query is used for display purposes only
    // helps educate the viewer about GraphQl
    let queryForDisplay = `query {
        transactions(first: ${numImages},
            tags: {
                name: "Content-Type",
                values: ["image/png"]
            }
        ) {
            edges {
                node {
                    id
                }
            }
        }
    };`;

    // called when the user clicks "query"
    const doQuery = async () => {
        // clear existing images
        setImages([]);
        // get new ones
        try {
            setMessage("Starting query");
            // Call parseInt on the numImages variable, otherwise JS thinks it's a string
            console.log("Starting query numImages=", numImages);
            const response = await client.query({
                query: GET_PNG,
                variables: { numImages: parseInt(numImages) },
            });
            setMessage("Query done");

            // pull out the transaction ids to use in img tags
            const edges = response.data.transactions.edges;
            const allUrls = [];
            for (let i = 0; i < edges.length; i++) {
                allUrls.push("https://arweave.net/" + edges[i].node.id);
            }
            setImages(allUrls);
        } catch (e) {
            setMessage("Query error ", e);
        }
    };

    return (
        <div className="bg-[#FEF4EE] h-screen">
            <h1 className="pt-10 pl-10 text-3xl font-mono font-bold underline">
                Arweave Blockweave Explorer
            </h1>
            <div>
                <p className="pt-1 pl-10 w-2/3 font-mono">
                    Example app to teach using GraphQL to query the Arweave
                    Blockweave. Queries for n most recent pngs posted to Arweave
                    and displays them below. Modify the query using the left
                    side of the screen, view the query results on the right. For
                    more info:
                </p>
                <ul className="list-disc mt-2 ml-5 pl-10">
                    <li>
                        <a
                            className="underline"
                            href="https://gql-guide.vercel.app/"
                            target="_blank"
                        >
                            Arweave GraphQL Documentation
                        </a>
                    </li>
                    <li>
                        <a
                            className="underline"
                            href="https://arweave.net/graphql"
                            target="_blank"
                        >
                            Arweave GraphQL Playground
                        </a>
                    </li>
                    <li>
                        <a
                            className="underline"
                            href="https://docs.bundlr.network/tutorials/graphql-explorer"
                            target="_blank"
                        >
                            Tutorial For This Project
                        </a>
                    </li>
                </ul>
            </div>
            <div className="flex flex-row pt-10 pl-10" id="title-area">
                <div className="w-1/3" id="query-configurer">
                    <span className="flex flex-col">
                        <label className="font-bold">
                            Number of images to retrieve: {numImages}{" "}
                        </label>
                        <input
                            id="default-range"
                            type="range"
                            min="10"
                            max="100"
                            value={numImages}
                            onChange={(e) => setNumImages(e.target.value)}
                            className="mt-2 w-full h-2 bg-gray-200 rounded-lg appearance-none cursor-pointer dark:bg-gray-700"
                        />
                    </span>

                    <textarea
                        id="queryForDisplay"
                        rows="14"
                        className="mt-5 p-2.5 w-full text-sm text-gray-900 bg-gray-50 rounded-lg border border-gray-300 focus:ring-blue-500 focus:border-blue-500 dark:bg-gray-700 dark:border-gray-600 dark:placeholder-gray-400 dark:text-white dark:focus:ring-blue-500 dark:focus:border-blue-500"
                        readOnly
                        value={queryForDisplay}
                    ></textarea>
                    <button
                        className="mt-5 bg-black hover:bg-blue-700 text-[#FEF4EE] rounded px-4 py-1 font-bold"
                        onClick={doQuery}
                    >
                        query
                    </button>
                    <p className="font-bold">{message}</p>
                </div>
                <div className="flex flex-col"></div>
                <div
                    className="w-2/3 flex flex-wrap ml-2 mr-2 border border-3 border-black"
                    id="query-results"
                >
                    {images.map((image, id) => {
                        return (
                            <a
                                href={image}
                                target="_blank"
                                className="underline"
                            >
                                <img
                                    className="mx-1 my-1"
                                    width="200"
                                    height="200"
                                    src={image}
                                    key={id}
                                />
                            </a>
                        );
                    })}
                </div>
            </div>
        </div>
    );
}
Conclusion
Rock-n-roll! You did it. Great job.
But ... as always ... there's more. A tutorial is a great way to learn but to really grok something you need to code some features of your own.
As a final challenge, try modifying the search to allow for the value of Content-Type tag to be set in the UI and then passed as a variable to the query.
Stuck? Confused? Not sure how to do it? Come join us in our Discord..
Finished your project? Share it on Twitter and tag us!
Ready to do something new? Check out our YouTube channel!
Remember, full code for this tutorial is in our GitHub.