Mixtape dApp + Alchemy SDK
Overview
I've been thinking a bit lately about how the way we access information has changed so much in the last 30 years. It's not that I'm trying to be a Luddite and bash technology, rather it's an interesting thought experiment to objectively look at how things have changed.
In the late 90s if you wanted to get some new music, you went to a record store, searched though the bins, maybe listened to some, then you bought your tunes, went home and listened. The first big change to this happened in 1998 when Amazon expanded their product catalog from just books to books, CDs and DVDs. Then in the early 2000s MP3.com and PeopleSound launched early music streaming, leading to the Spotify and Apple Music we all use today.
Both Amazon's storefront and the streaming services introduced detailed search engines we could use to find the exact track we were looking for. You could search by artist name, recording date, genre and pretty much any criteria you might think of. Objectively that seems like a step forward over looking through bins, but I wonder if my music tastes have become more homogenous because I let these search engines guide me too much.
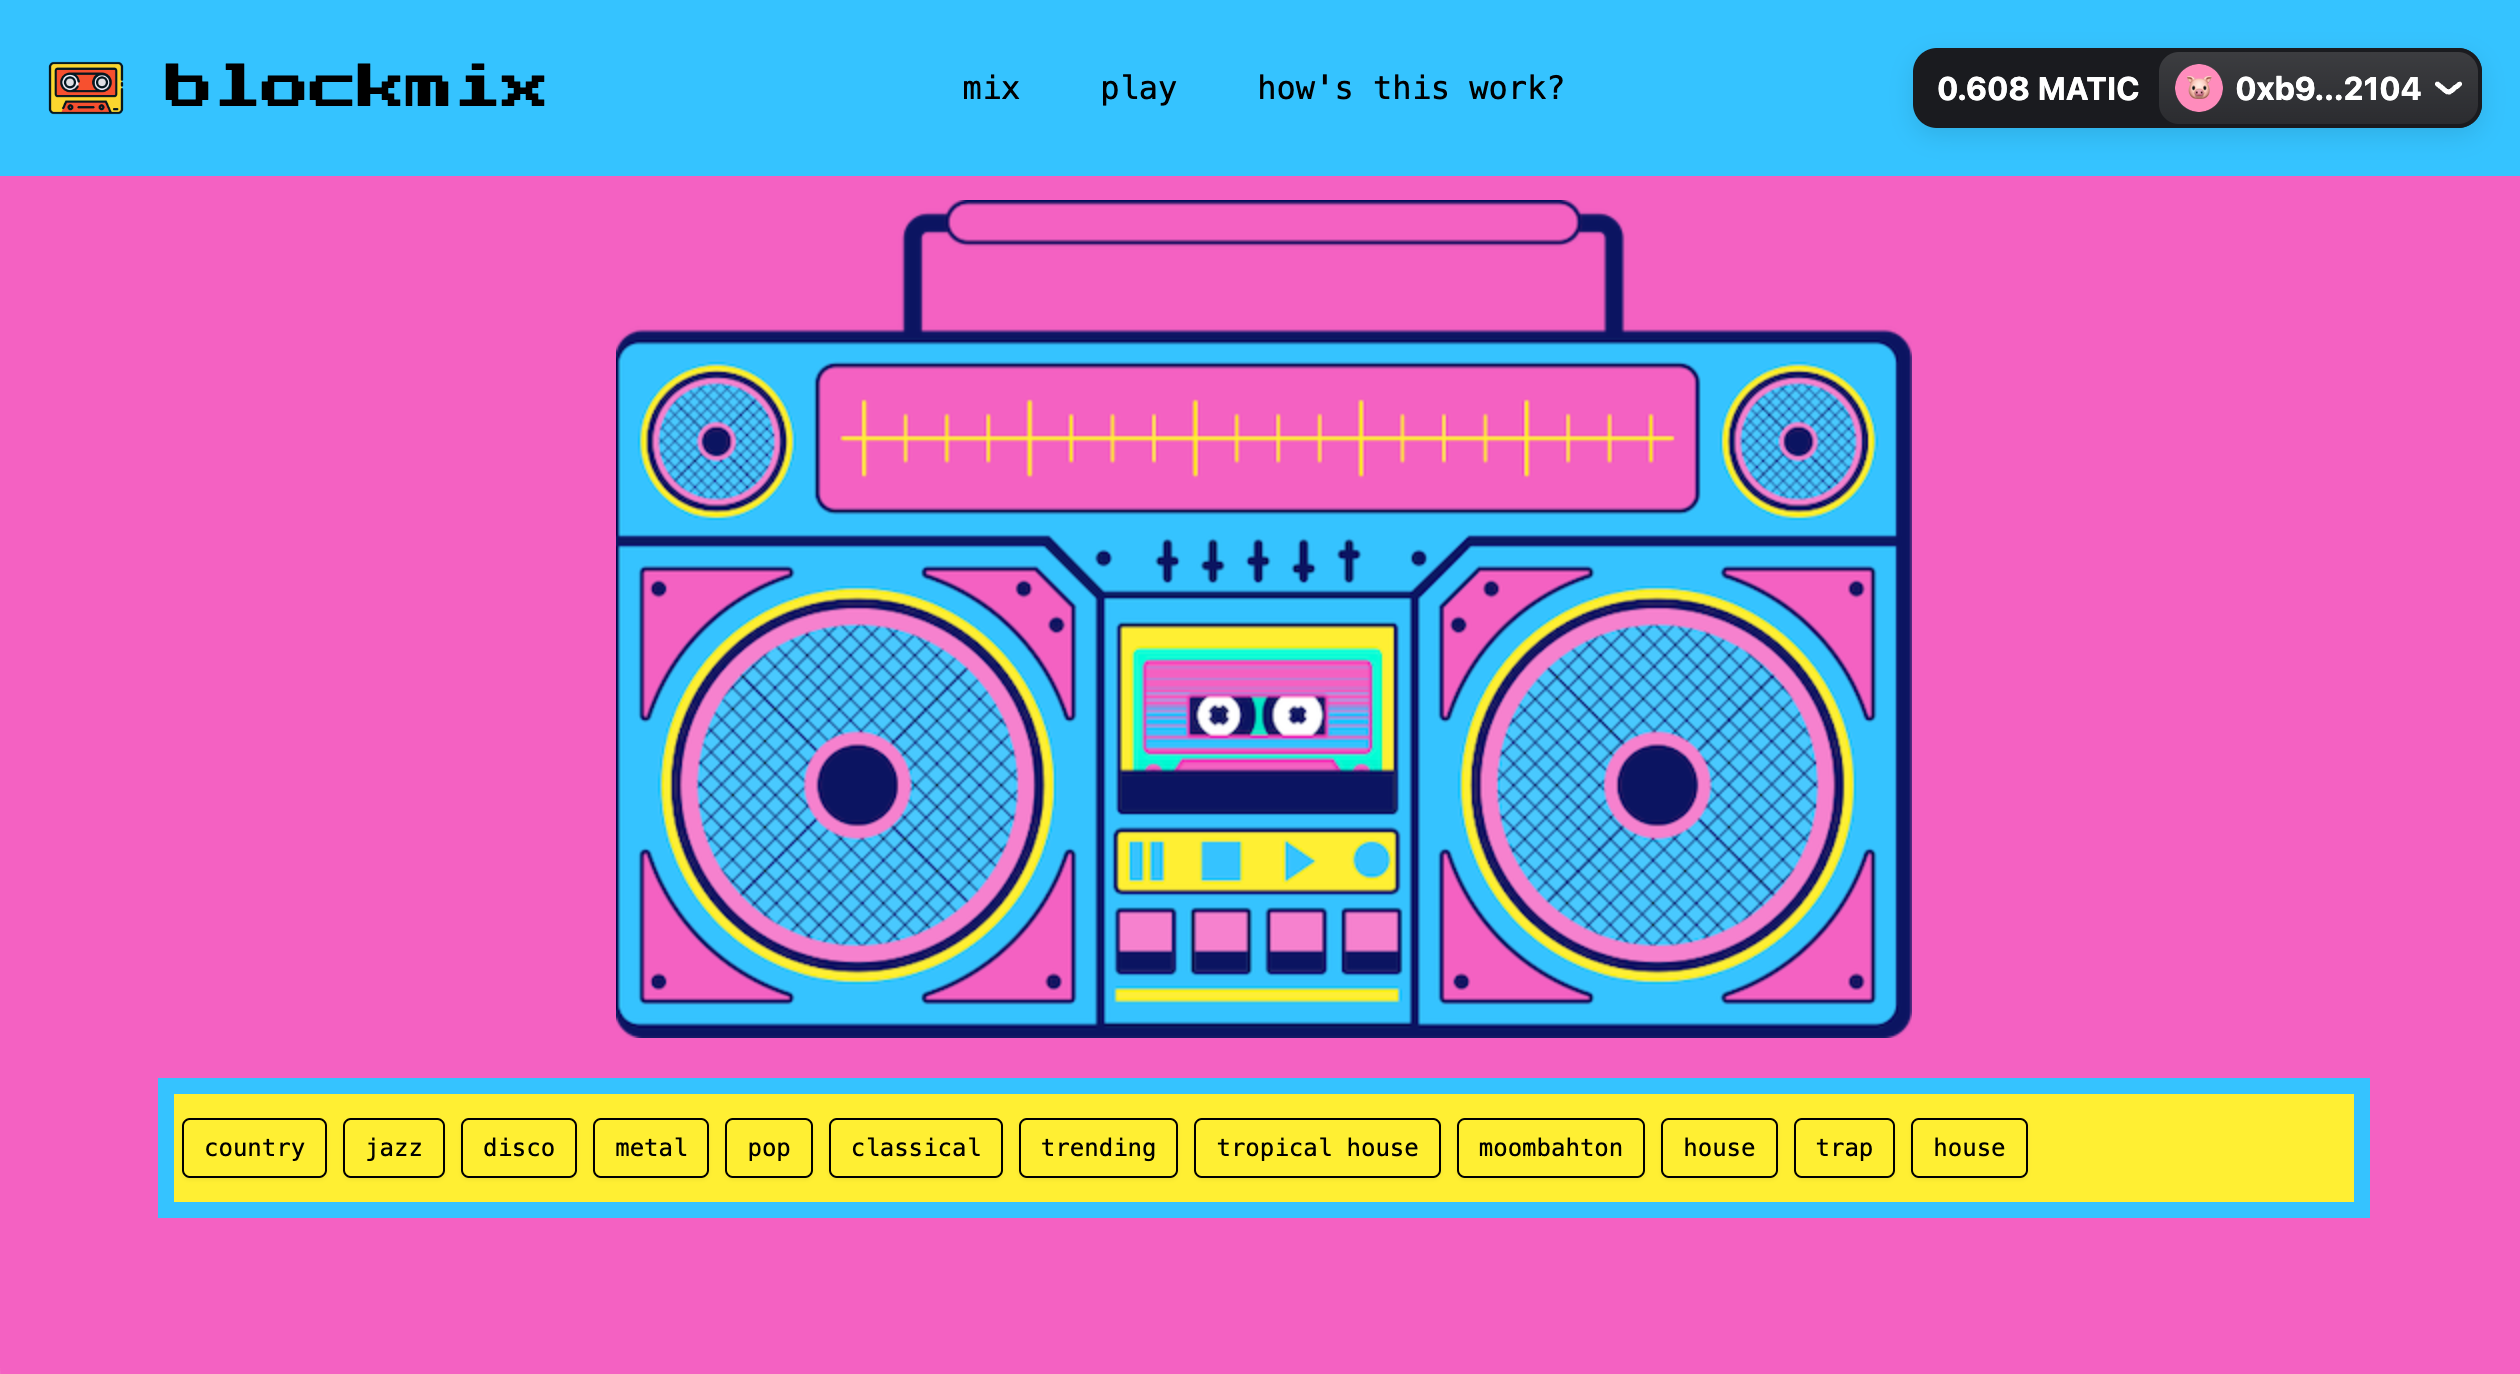
The whole idea for Blockmix (what we're building today) started with me thinking about building the anti-search engine. I wanted to create something where you could search only by genre and then I wanted to limit the genres available for searching. I also wanted to randomize search results, not returning them sorted by popularity or alphabetically, rather I wanted to emulate record bins that were constantly re-shuffled by customers. Finally, I started thinking about all the happy accidents that happened when I came across albums that had been filed incorrectly. I decided to add one last feature to my search engine where I'd sprinkle each search result with random tracks not belonging to any one search criteria.
A search engine with no way to save results is no fun ... so I decided to keep with the 90s theme and let users make mixtapes of the songs they found.
And that is the origin story of Blockmix, a very very cool cross-chain, cross-contract mixtape-making music dApp. Y'all ready to build something fun?
All of the code for this project can be found in this GitHub repository. You're welcome to clone it and work from there, or just refer back to it if you get stuck.
Architecture
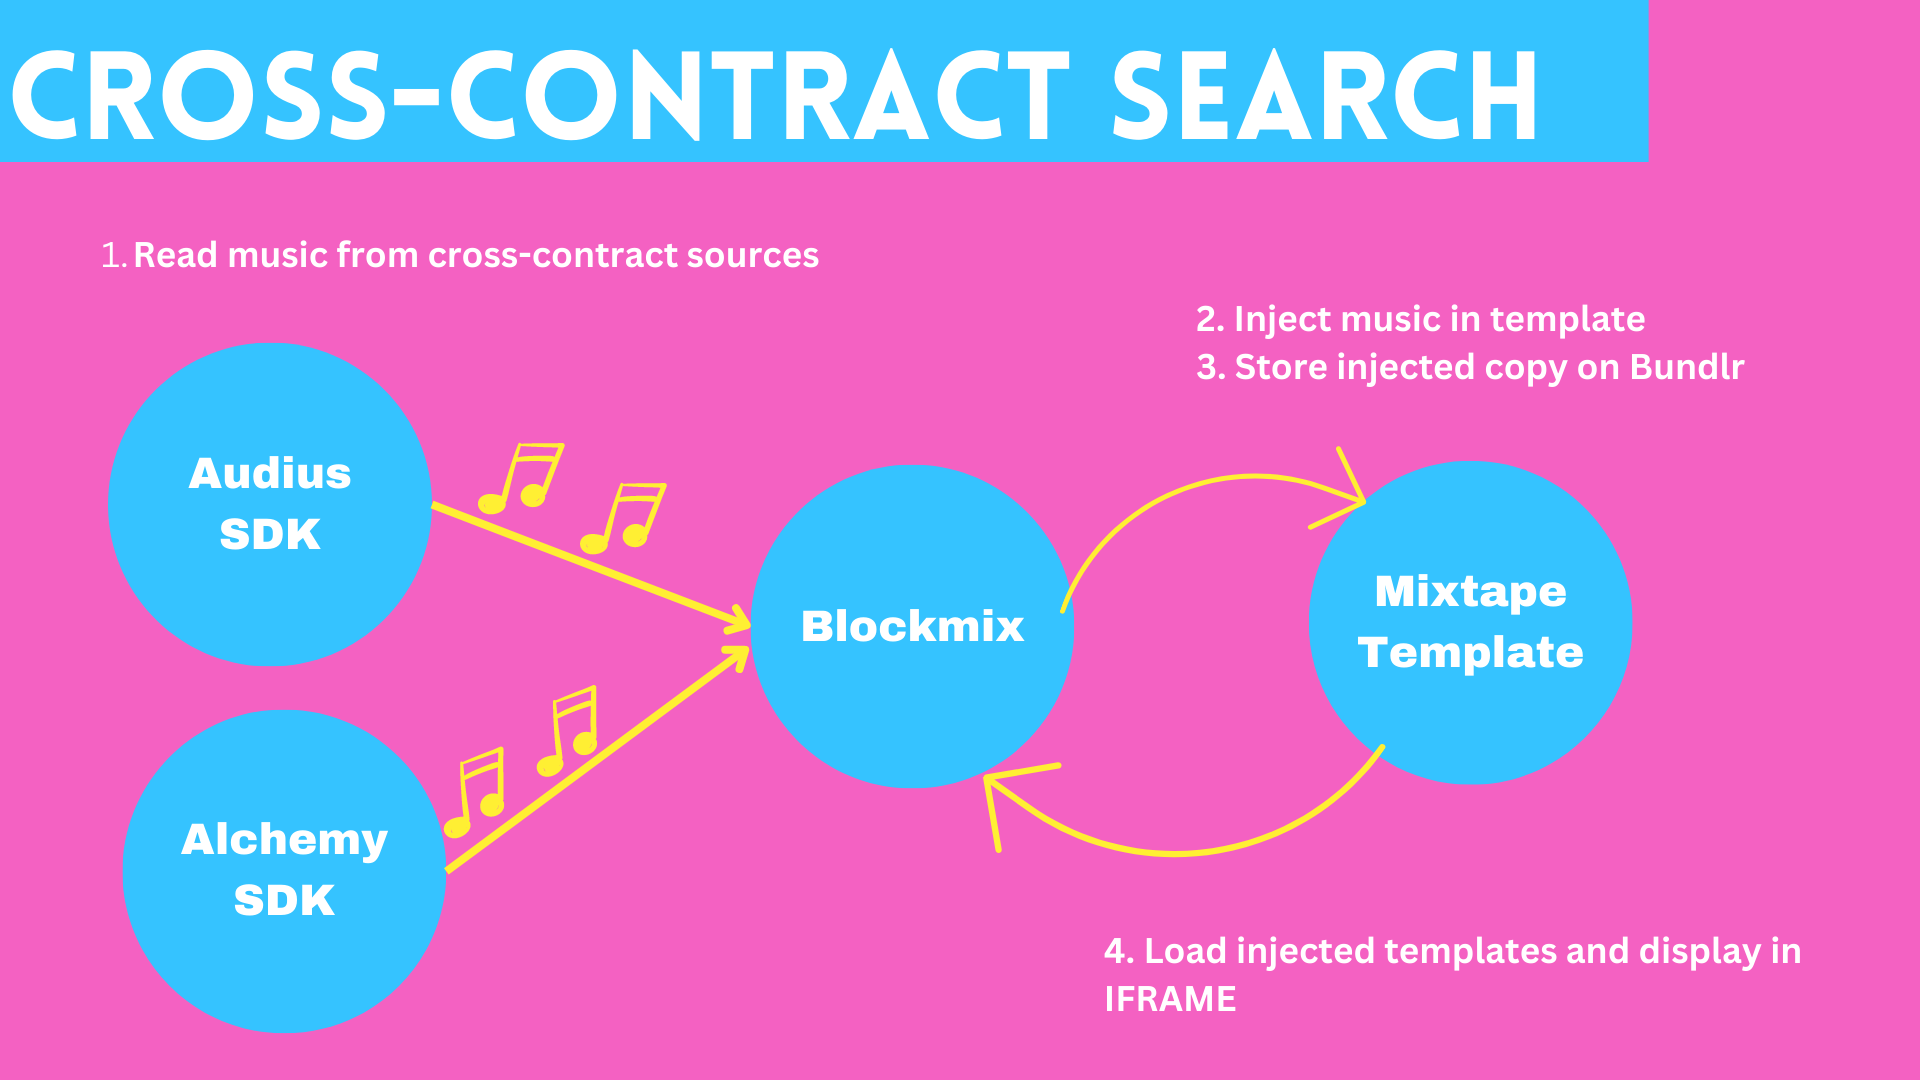
One of the missing apps in the music NFT ecosystem is a tool to easily listen to songs minted from different contracts across different chains. Listeners don't want to know or care which chain you're on or even what a contract is. In building Blockmix, I decided to design an architecture that would let me aggregate data from multiple sources and make it easy for users to create a single mixtape with that data. Since this is a tutorial and I need to make the codebase manageable, I decided to just focus on two different sources, however the architecture could be easily expanded on when you implement it yourself.
Audius has a really nice JavaScript SDK we'll use for one data feed, and for the second data feed we'll use Alchemy's NFT API and pull song data from Async's Music's Blueprint Contract. The Alchemy NFT API makes it super easy to read metadata from any NFT contract, the code we write to interact with the Async Music contract could easily be repurposed to feature just about any contract.
Users will interact with Blockmix and create a mixtape with songs from two sources, then we'll take song data in JSON format and inject it into a mixtape template and store on Arweave using Bundlr.
Finally Blockmix will provide a page where users can see all of their mixtapes and play them from start to finish.
We'll build the main Blockmix app using React, RainbowKit and Tailwind. The mixtape template will be a single file of VanillaJS and HTML.
Setup
Create a new directory for your project, cd into it, and create your React project:
mkdir blockmix
cd blockmix
npx create-react-app .
Install the Bundlr library, ethers verison 5, the Audius SDK and react-router-dom.
npm install @bundlr-network/client ethers@5 @audius/sdk react-router-dom
From here, you'll need to further configure your project to make create-react-app work with the Bundlr SDK, since we do this with most of our tutorials, I've abstracted out the steps here. Go follow those steps, then come back here.
Tailwind
We’ll use Tailwind instead of plain CSS for styling, but you’re welcome to style things any way you like.
Install tailwindcss via npm, and create your tailwind.config.js file.
npm install -D tailwindcss
npx tailwindcss init
Add the paths to all of your template files in your tailwind.config.js file.
/** @type {import('tailwindcss').Config} */

module.exports = {
    content: ["./src/**/*.{js,jsx,ts,tsx}"],
    theme: {
        extend: {},
    },

    plugins: [],
};
Modify your src/index.css file so it looks like this:
@tailwind base;
@tailwind components;
@tailwind utilities;
Run this from your command line
npx tailwindcss -i ./src/input.css -o ./dist/output.css --watch
RainbowKit
The last little bit of setup is adding support for RainbowKit and the WAGMI hooks for React. RainbowKit makes it super easy to integrate support for MetaMask and other Ethereum-based wallets into your React-based dApp. It's not the only way to do things, but it makes things very very easy.
Install RainbowKit and related dependencies.
npm install @rainbow-me/rainbowkit wagmi
Replace your src/index.js file with the following.
import React from "react";
import ReactDOM from "react-dom/client";
import "./index.css";
import App from "./App";

import "@rainbow-me/rainbowkit/styles.css";
import { getDefaultWallets, RainbowKitProvider, darkTheme } from "@rainbow-me/rainbowkit";
import { chain, configureChains, createClient, WagmiConfig } from "wagmi";
import { publicProvider } from "wagmi/providers/public";

const { provider, chains } = configureChains([chain.polygonMumbai], [publicProvider()]);

const { connectors } = getDefaultWallets({
    appName: "Blockmix",
    chains,
});
const wagmiClient = createClient({
    autoConnect: true,
    connectors,
    provider,
});
const root = ReactDOM.createRoot(document.getElementById("root"));
root.render(
    <React.StrictMode>
        <WagmiConfig client={wagmiClient}>
            <RainbowKitProvider
                chains={chains}
                theme={darkTheme({
                    accentColor: "#82A8A1",
                    accentColorForeground: "#2F8A97",
                })}
            >
                <App />
            </RainbowKitProvider>
        </WagmiConfig>
    </React.StrictMode>,
);
Most of index.js will look familiar if you've done any React coding, but there is some RainbowKit-specific stuff too.
This block of code configures the blockchains our application can connect to. Since we're only connecting to the Bundlr devnet, we'll offer Polygon Mumbai as an option. If you expand on this tutorial and want to work with different blockchains, this is where you'd add support for them.
const { provider, chains } = configureChains([chain.polygonMumbai], [publicProvider()]);
Your entire application needs to be wrapped with RainbowKitProvider and WagmiConfig. In my code, I further configure the colors used in the connect button. Here's a version of the code with just the bare necessities so you can focus on what's happening.
const App = () => {
    return (
        <WagmiConfig client={wagmiClient}>
            <RainbowKitProvider chains={chains}>
                <App />
            </RainbowKitProvider>
        </WagmiConfig>
    );
};
Design
It's much more fun to build things that actually look cool. Sure I could write this whole tutorial just using basic colors and no artwork, but who wants to look at basic colors all day long ... right?
I found this free set of 90s vectors that I thought would be great to base the project on. I pulled out a bunch of the individual assets and put them in the project GitHub under src/assets/images. Feel free to grab the assets in our GitHub, or play around with the vector file and create your own.
Also, this pixelated font will make our logo and headers really pop.
index.html
Start by opening up public/index.html and adding the following anywhere in the <head> section.
<link href="https://fonts.googleapis.com/css2?family=Press+Start+2P&display=swap" rel="stylesheet" />
I've added a few other things to index.html, including some imports and page title. You can copy and paste this full text into public/index.html.
<!DOCTYPE html>
<html lang="en">
    <head>
        <!-- Required to add web3 this way instead of via npm per:
        https://www.npmjs.com/package/@audius/sdk -->
        <script src="https://cdn.jsdelivr.net/npm/web3@latest/dist/web3.min.js"></script>

        <meta charset="utf-8" />
        <link rel="icon" href="%PUBLIC_URL%/favicon.ico" />
        <meta name="viewport" content="width=device-width, initial-scale=1" />
        <meta name="theme-color" content="#000000" />
        <meta name="description" content="Mixing beats for your dancing feets..." />

        <link rel="manifest" href="%PUBLIC_URL%/manifest.json" />

        <title>Blockmix</title>
        <link rel="preconnect" href="https://fonts.gstatic.com" />
        <link
            href="https://fonts.googleapis.com/css2?family=Press+Start+2P&display=swap"
            rel="stylesheet"
        />
    </head>
    <body>
        <noscript>You need to enable JavaScript to run this app.</noscript>
        <div id="root"></div>
    </body>
</html>
Next modify tailwind.config.js so it contains both the font and also some colors based on those 90s vector graphics. If the colors are too bold and bright for your tastes, feel free to pick your own.
module.exports = {
    content: ["./src/**/*.{js,jsx,ts,tsx}"],

    theme: {
        extend: {
            fontFamily: {
                "press-start": ['"Press Start 2P"', "cursive"],
            },
        },
        colors: {
            background: "#F461C2",
            primary: "#35C3FF",
            secondary: "#FFEF33",
            highlight: "#00FDD6",
            header: "#D83B25",
            text: "gray-900",
        },
    },
    plugins: [],
};
Template
Before diving into the React project, let's build the mixtape template.
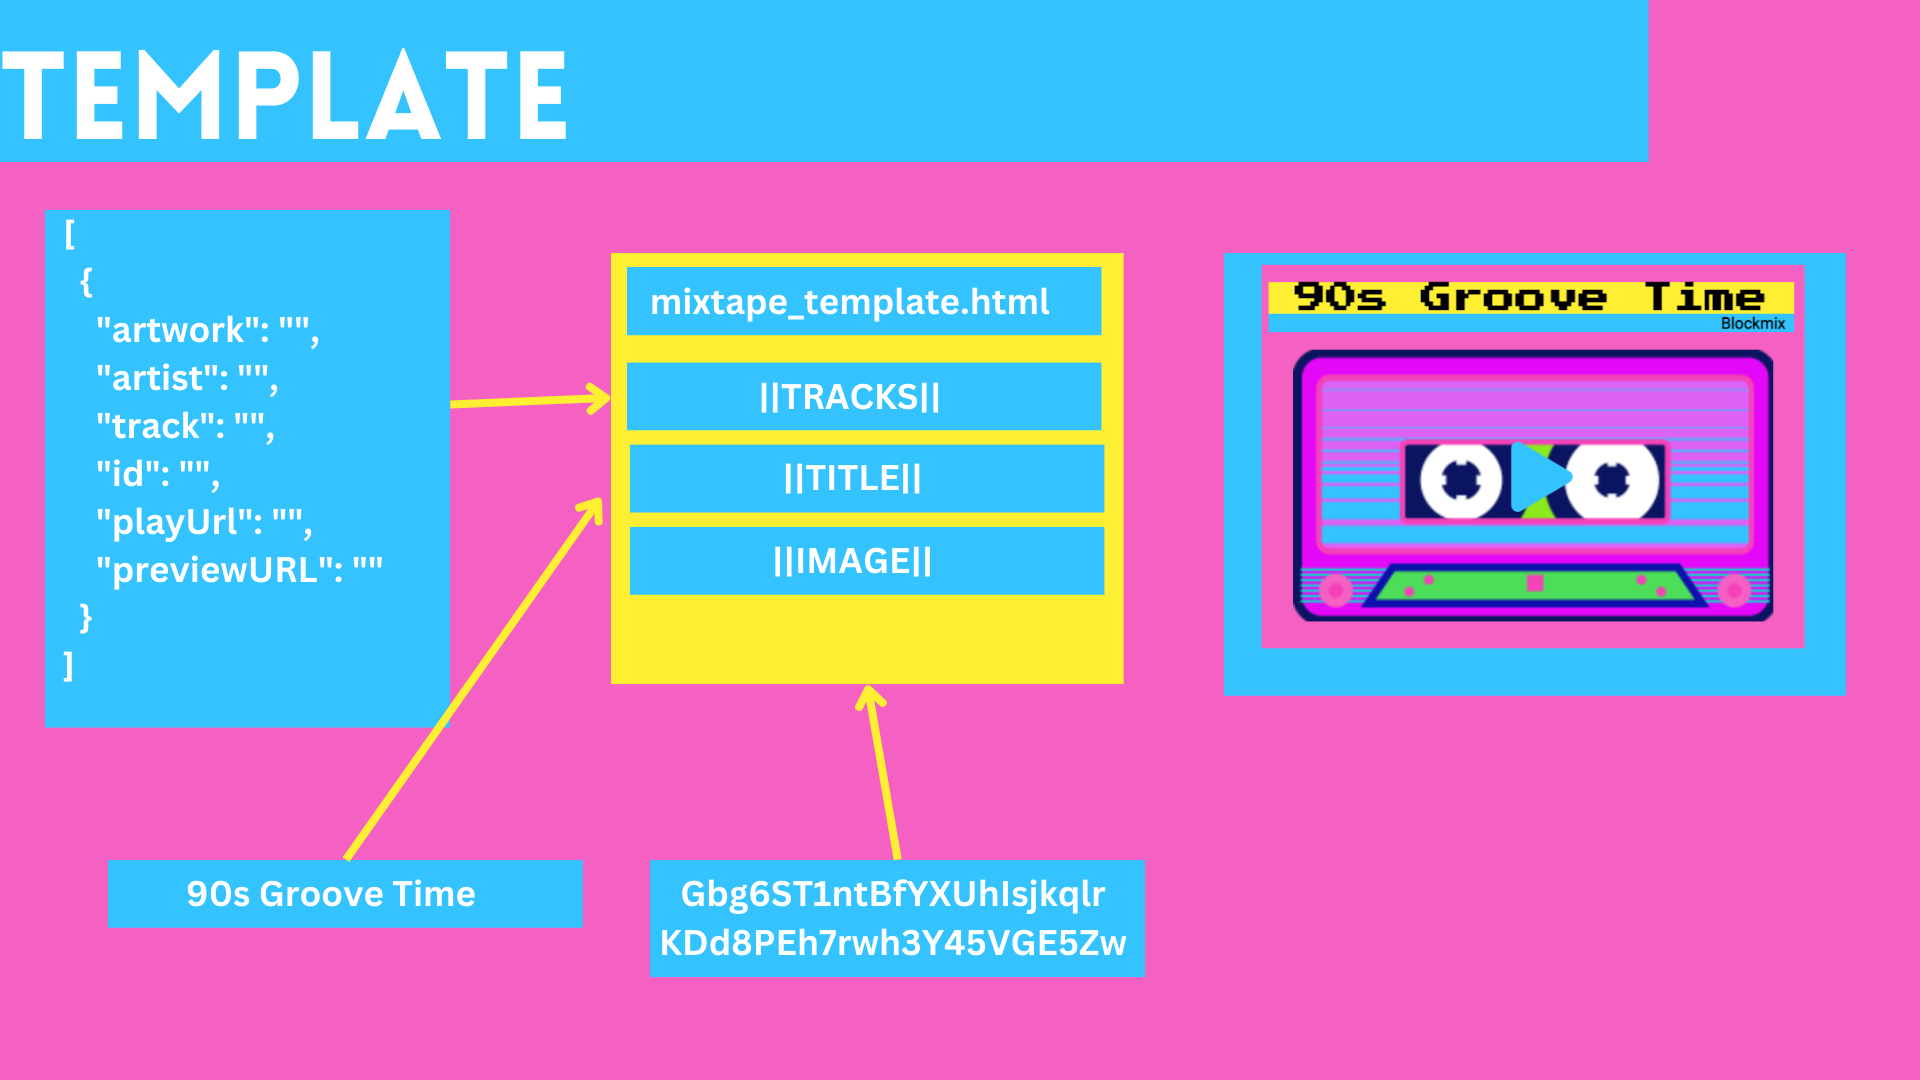
The mixtape template will be a single .html file containing a mix of html, css and JavaScript. We will use a simple templating system that allows us to inject values into the template when the user initiates a save. The template itself will have two states, a smaller state showing just a graphic of a cassette, the playlist title and a play button. Then we'll have an expanded state showing each of the mixtape's tracks. When in expanded form, the track icons can be clicked on to view the full NFT page.

Track Data
Track data will be stored in the following format. It's a format that will allow us to easily play music from any on-chain source, and also allow us to provide enough song metadata that the original creators can be easily credited.
In the actual template, we'll mark the location where this data should be injected with the tag ||TRACKS||
[
    {
        "artwork": "",
        "artist": "",
        "track": "",
        "id": "",
        "playUrl": "",
        "previewURL": ""
    }
]
Mixtape Title
The Mixtape title will be written by the user at creation time and injected into the template at the location marked by the tag ||TITLE||.
Mixtape Image
For the mixtape image, I took the cassette tape graphic on that page of 90s vectors and made 20 different versions each with different colors. Then when the user initiates a save, I pick one image at random and inject it into the template at a location marked by the tag ||IMAGE||.
Template HTML
Here's the full html for the template, I'm not going to dig into it line by line as the focus of this tutorial is on using Bundlr and not on HTML and CSS. As you do look at the code though, pay attention to lines 158, 197 and 204 where we set the template up.
I'll be the first to admit that I'm no CSS guru. I had an idea for what I wanted the mixtape to look like, but had to Google around to figure out the right CSS. I've credited original authors in the comments in case you want to dig in a bit deeper.
<!DOCTYPE html><html> <head> <title>NFT MixTape</title> <meta name="description" content="Flashback track smack" /> <meta name="keywords" content="living like it's 1995" /> <link rel="preconnect" href="https://fonts.googleapis.com" /> <link rel="preconnect" href="https://fonts.gstatic.com" crossorigin /> <link href="https://fonts.googleapis.com/css2?family=Press+Start+2P&display=swap" rel="stylesheet" /> <link href="https://fonts.googleapis.com/css2?family=Roboto&display=swap" rel="stylesheet" /> <link rel="stylesheet" href="https://use.fontawesome.com/releases/v5.7.2/css/all.css" integrity="sha384-fnmOCqbTlWIlj8LyTjo7mOUStjsKC4pOpQbqyi7RrhN7udi9RwhKkMHpvLbHG9Sr" crossorigin="anonymous" /> <style> * { margin: 0; padding: 0; border: 0; } body { background-color: #f461c2; } h1 { background-color: #35c3ff; font-family: "Press Start 2P", cursive; font-size: 35px; } h2 { background-color: #ffef33; font-family: "Press Start 2P", cursive; font-size: 18px; } h3 { background-color: #00fdd6; font-family: "Roboto"; font-size: 15px; } h4 { font-family: "Roboto"; font-size: 9px; padding-right: 5px; } img { margin-bottom: 2px; } #branding { width: 300px; text-align: right; background-color: #35c3ff; } #wrapper { width: 300px; margin: auto; display: flex; flex-direction: row; justify-content: center; } #innerWrapper { display: flex; flex-direction: column; justify-content: center; } #playList { display: none; flex-wrap: wrap; gap: 2px; padding-top: 5px; margin-left: 5px; } #title { text-align: center; display: flex; flex-direction: column; padding-top: 10px; padding-right: 2px; max-width: 300px; } #action { text-align: center; } /* VIDEO OVERLAY FROM: https://douglasgreen.com/create-a-responsive-video-play-button-overlay/ */ /* Just a parent container for the videos */ #videos { margin: 10px auto; } /* Individual video container */ #video-wrap { --play-icon: "\f04b"; --pause-icon: "\f04c"; --playPause-icon: "\f04b"; } #video-wrap { position: relative; max-width: 300px; width: 100%; margin-bottom: 10px; } #video-wrap #placeholder { max-width: 700px; width: 100%; } #video-wrap #play-btn { position: absolute; max-width: 300px; width: 60px; height: 60px; left: 50%; top: 50%; transform: translate(-50%, -80%); line-height: 1; /* needed if using Bootstrap */ text-align: center; color: #35c3ff; transition: color, background-color 0.2s ease; } #video-wrap #play-btn:hover, #video-wrap #play-btn:focus { color: #ff3f3f; cursor: pointer; } #play-btn::after { /* Font Awesome recommends these styles https://fontawesome.com/how-to-use/on-the-web/advanced/css-pseudo-elements */ display: inline-block; font-style: normal; font-variant: normal; text-rendering: auto; -webkit-font-smoothing: antialiased; /* Define the font family, weight, and icon */ font-family: "Font Awesome 5 Free"; font-weight: 900; font-size: 40px; content: var(--playPause-icon); /* positioning tweaks */ padding-top: 20px; padding-left: 10px; } </style> <script src="https://cdn.jsdelivr.net/npm/web3@latest/dist/web3.min.js"></script> <script src="https://cdn.jsdelivr.net/npm/@audius/sdk@latest/dist/sdk.min.js"></script> <script> let playing = false; let showTracks = false; const queryString = window.location.search; const urlParams = new URLSearchParams(queryString); const showTracksQueryParam = urlParams.get("showTracks"); if (showTracksQueryParam && showTracksQueryParam.indexOf("true") != -1) showTracks = true; const tracks = ||TRACKS|| const audioObjects = []; const playAll = async () => { if (playing) { // currently playing, so let's pause for (let i = 0; i < audioObjects.length; i++) { audioObjects[i].pause(); } const playIcon = getComputedStyle( document.getElementById("video-wrap"), ).getPropertyValue("--play-icon"); document.getElementById("video-wrap").style.setProperty("--playPause-icon", playIcon); playing = false; return; } // we're not playing, so change icon to pause and start playing const pauseIcon = getComputedStyle(document.getElementById("video-wrap")).getPropertyValue( "--pause-icon", ); document.getElementById("video-wrap").style.setProperty("--playPause-icon", pauseIcon); //document.getElementById("playPause").innerHTML = "Pause"; playing = true; for (let i = 0; i < audioObjects.length; i++) { audioObjects[i].play(); while (!audioObjects[i].ended) { await new Promise((resolve) => setTimeout(resolve, 1000)); } } playing = false; }; </script> </head> <body> <div id="wrapper"> <div id="innerWrapper"> <div id="title"> <h2>||TITLE||</h2> <div id="branding"><h4>Blockmix</h4></div> </div> <div id="videos"> <div id="video-wrap"> <a href="#" id="playPause" onClick="playAll()"> <div id="play-btn"></div> <img src="||IMAGE||" /> </a> </div> </div> </div> <div id="playList"></div> </div> <script> for (let i = 0; i < tracks.length; i++) { const audio = new Audio(tracks[i].playUrl); audioObjects.push(audio); var img = document.createElement("img"); img.setAttribute("id", "playlistItem"); img.setAttribute("src", tracks[i].artwork); img.setAttribute("height", "100"); img.setAttribute("width", "100"); img.setAttribute("alt", tracks[i].track); var link = document.createElement("a"); link.setAttribute("href", tracks[i].previewURL); link.target = "_blank"; link.appendChild(img); document.getElementById("playList").appendChild(link); } if (showTracks) { document.getElementById("playList").style.display = "block"; document.getElementById("wrapper").style.width = "900px"; } else { document.getElementById("playList").style.display = "none"; document.getElementById("wrapper").style.width = "300px"; } </script> </body></html>Moving The Template On-Chain
Our template consists of the document above and also the 20 different cassette images. Since the images and template file are immutable, we can move them onto Arweave using Bundlr and then not have to worry about them again. You can either follow along with the following steps, or just read along and use the versions I uploaded already. The rest of the tutorial code will reference the versions I uploaded to Bundlr myself, and since the data is available publically and guaranteed to be there forever, there's no need to duplicate the uploads if you don't want to.
To upload to Arweave via Bundlr, we'll use our CLI. First copy and paste the template into a file called mixtape-template.html and put it in a directory titled bundlr-uploader along with the the 20 cassette tape images.
Then, fire up your CLI and cd into the parent directory of the bundlr-uploader you just created.
If you haven't done so already, install our SDK using one of the following commands (you may or may not need to sudo, depends on your setup).
npm i -g @bundlr-network/client
sudo npm i -g @bundlr-network/client
Create a file in the same parent directory called privateKey.json containing a private key for a wallet you've funded with a small amount of cryptocurrency. You can use any of the currencies we support, in my example I'll be using Arweave.
Then (again from the parent directory) run the following command.
bundlr upload-dir bundlr-uploader -c arweave -h http://node2.bundlr.network -w privateKey.json
After running the command, you'll notice a file created in your local file system titled bundlr-uploader-manifest.json, this contains the transaction ids for each of the files uploaded to Bundlr. They can be downloaded by creating an URL with the format https://arweave.net/[transaction-id]. The link to my template is https://arweave.net/lsjOqRmeBq0nP62WlJt3I6K_yD0CiM9-N8TB1Hfh31g.
That's it! Amazing, huh? One command, a few seconds of processing, a very small fee paid and all that data is not only uploaded to the permaweb, but guaranteed to be there for a minimum of 200 years.
Page Structure
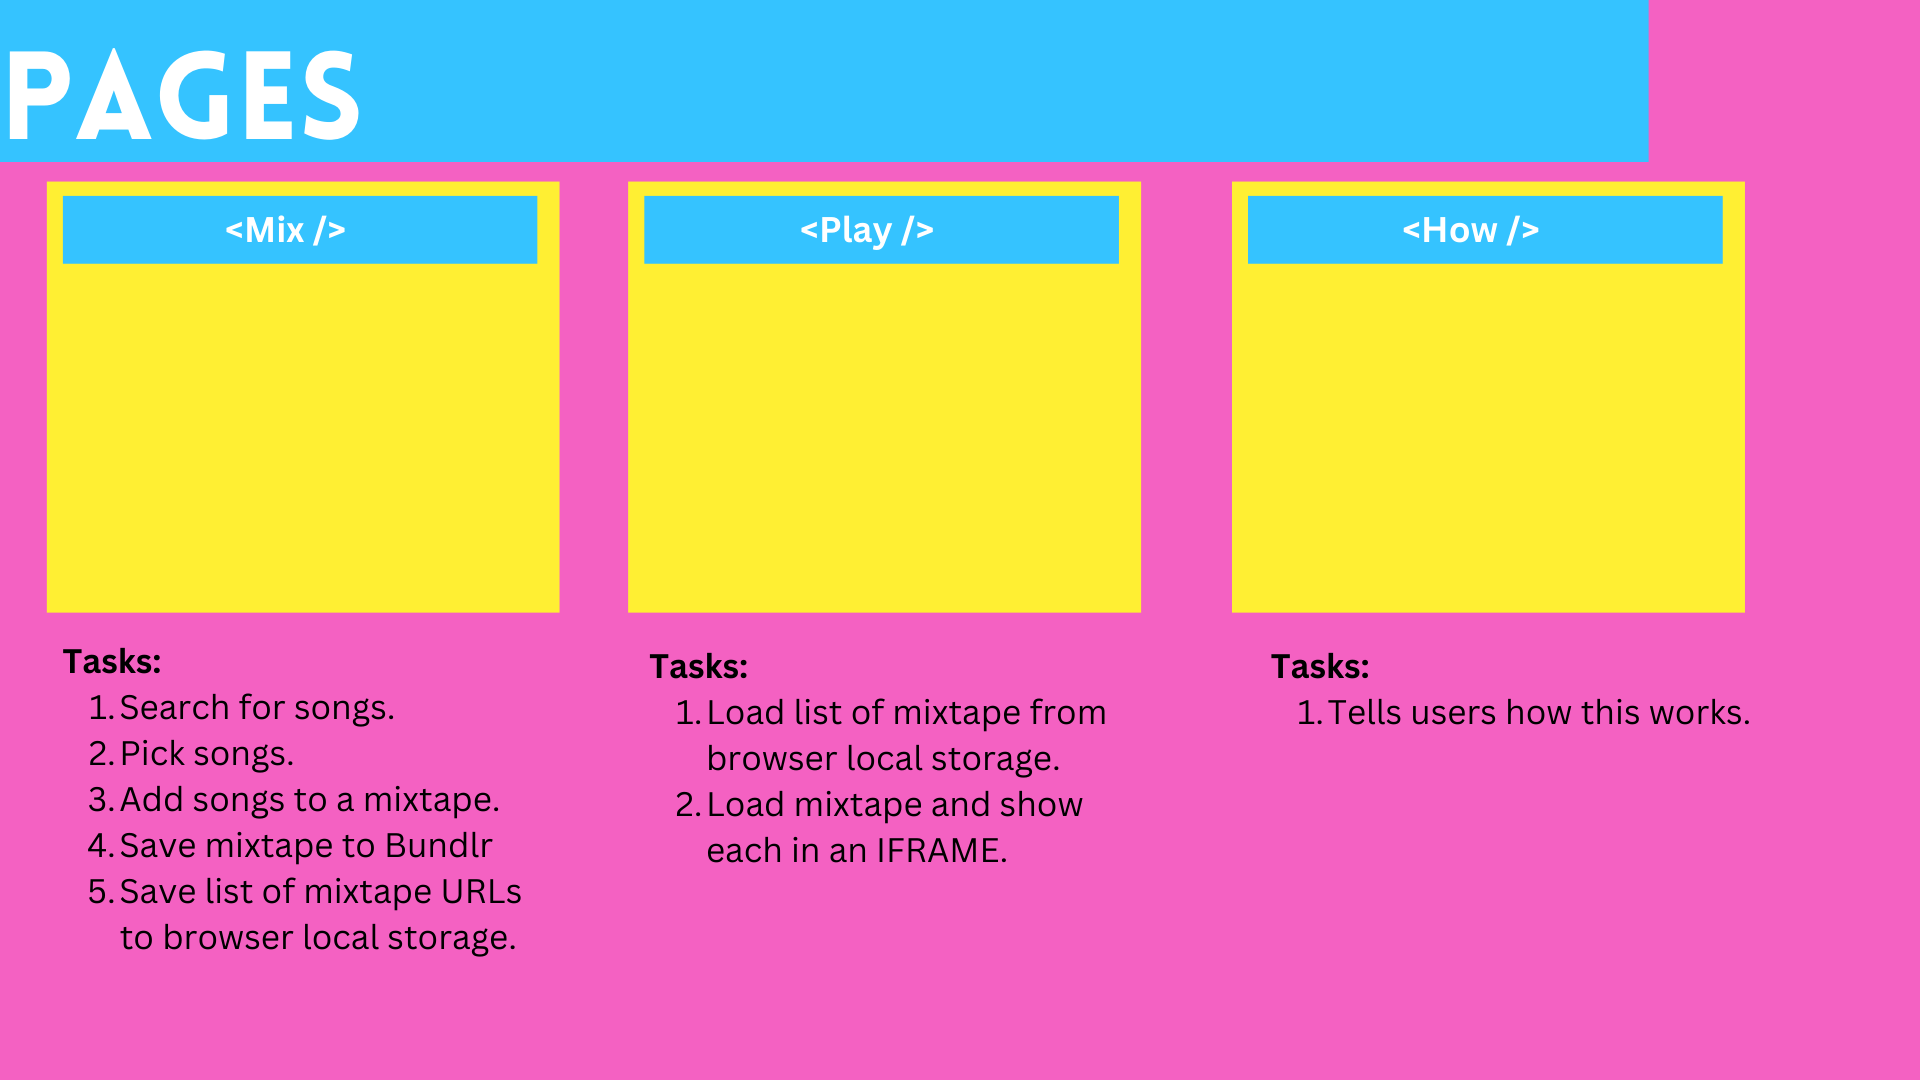
Our app will have three main pages, one for mixing mixtapes, one for playing existing tapes and then an about page. Let's create stubs for those first.
/pages/Mix.js
import React from "react";

const Mix = () => {
    return <div>Mix</div>;
};

export default Mix;
/pages/Play.js
import React from "react";

const Play = () => {
    return <div>Play</div>;
};

export default Play;
/pages/How.js
import React from "react";

const How = () => {
    return <div>How</div>;
};

export default How;
App.js
We'll build the Mix page first, but before we dive in, replace the contents of your App.js file with this updated version that provides browser routing for our URLs.
import NavBar from "./components/NavBar";import Mix from "./pages/Mix";import Play from "./pages/Play";import How from "./pages/How";import { BrowserRouter, Routes, Route } from "react-router-dom";function App() { return ( <div className="App" id="app"> <NavBar /> <BrowserRouter> <Routes> <Route path="/" element={<Mix />} /> <Route path="/mix" element={<Mix />} /> <Route path="/play" element={<Play />} /> <Route path="/how" element={<How />} /> </Routes> </BrowserRouter> </div> );}export default App;Navbar
And then make a new folder called componennts and add this into NavBar.js.
import { Fragment } from "react";import { Popover, Transition } from "@headlessui/react";import { Bars3Icon } from "@heroicons/react/24/outline";import logo from "../assets/images/cassette-tape-256.png";import { ConnectButton } from "@rainbow-me/rainbowkit";export default function NavBar() { return ( <div className="fixed w-full z-10"> <Popover className=" bg-primary"> <div className="mx-auto max-w-7xl px-4 sm:px-6"> <div className="flex items-center py-6 justify-start space-x-10"> <div className="flex justify-start lg:w-0 lg:flex-1"> <a href="/"> <img className="h-8 w-auto sm:h-10" src={logo} alt="" /> </a> <span className="text-2xl font-press-start pl-5 pt-1">blockmix</span> </div> <div className="-my-2 -mr-2 md:hidden"> <Popover.Button className="inline-flex items-center justify-center rounded-md bg-white p-2 text-gray-400 hover:bg-gray-100 hover:text-gray-500 focus:outline-none focus:ring-2 focus:ring-inset focus:ring-indigo-500"> <span className="sr-only">Open menu</span> <Bars3Icon className="h-6 w-6" aria-hidden="true" /> </Popover.Button> </div> <Popover.Group as="nav" className="hidden space-x-10 md:flex"> <a href="/mix" className="font-mono text-base font-medium text-gray-500 hover:bg-highlight" > mix </a> <a href="/play" className="font-mono text-base font-medium text-gray-500 hover:bg-highlight" > play </a> <a href="/how" className="font-mono text-base font-medium text-gray-500 hover:bg-highlight" > how's this work? </a> </Popover.Group> <div className="hidden items-center justify-end md:flex md:flex-1 lg:w-0"> <ConnectButton /> </div> </div> </div> <Transition as={Fragment} enter="duration-200 ease-out" enterFrom="opacity-0 scale-95" enterTo="opacity-100 scale-100" leave="duration-100 ease-in" leaveFrom="opacity-100 scale-100" leaveTo="opacity-0 scale-95" > <Popover.Panel focus className="absolute inset-x-0 top-0 origin-top-right transform p-2 transition md:hidden" > <div className="divide-y-2 divide-gray-50 rounded-lg bg-white shadow-lg ring-1 ring-black ring-opacity-5"> <div className="space-y-6 py-6 px-5"> <div className="grid grid-cols-2 gap-y-4 gap-x-8"> <a href="/mix" className="text-base font-medium text-gray-900 hover:bg-highlight" > mix </a> <a href="/play" className="text-base font-medium text-gray-900 hover:bg-highlight" > play </a> <a href="/how" className="font-mono text-base font-medium text-gray-500 hover:bg-highlight" > how's this work? </a> </div> <div> <ConnectButton /> </div> </div> </div> </Popover.Panel> </Transition> </Popover> </div> );}Mix.js
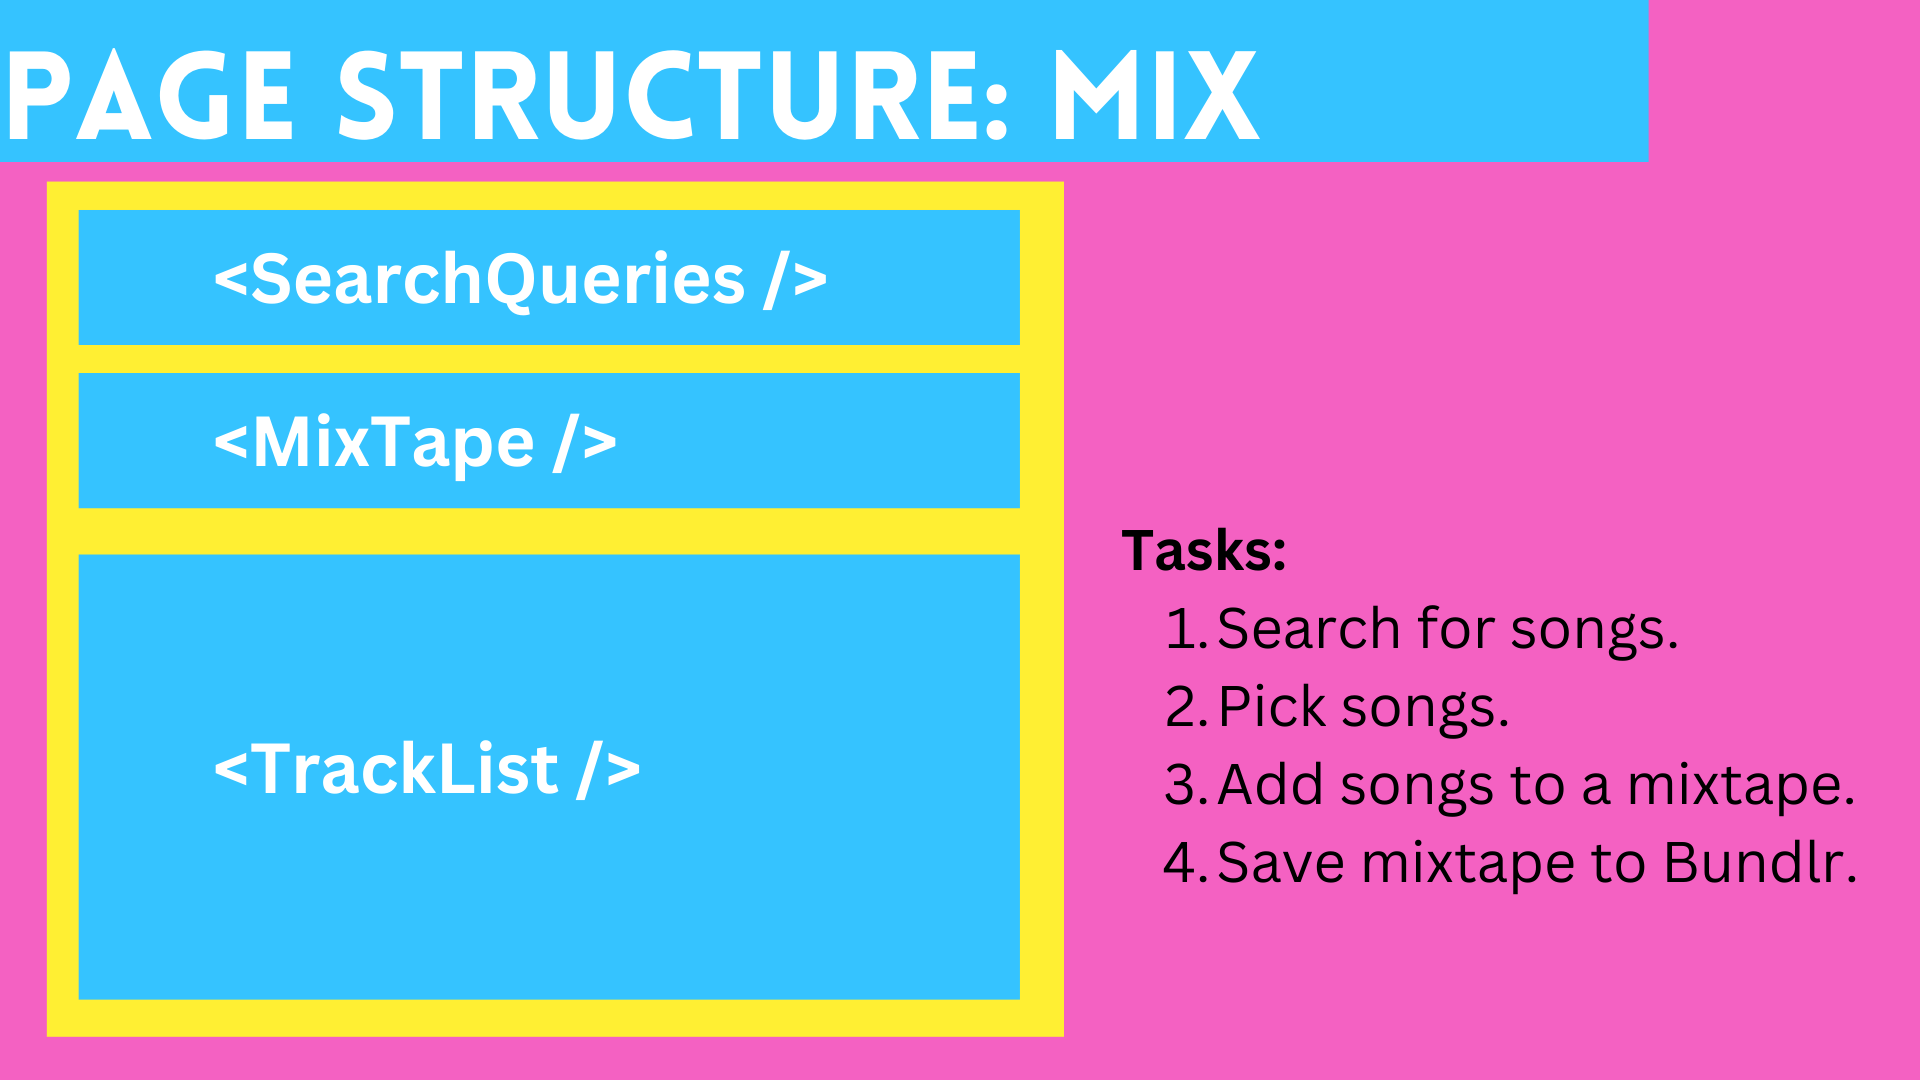
The page Mix.js is where the bulk of our work happens. It's where we:
- Search for songs.
- Mix search results from multiple sources.
- Trim the search results to add randomness.
- Add songs to a mixtape.
- Name the mixtape.
- Save the mixtape to Bundlr.
- Save the mixtape URL to the browser's local storage.
I've abstracted out a bunch of the logic into different components:
<SearchQueries />A list of search options (genres).<MixTape />The actual mixtape logic, this is where we'll save to Bundlr.<TrackList />A table showing search results.<SplashScreen />A opening screen showing some cool 90s graphics
Full Code
Start by typing this into pages/Mix.js, once you're done we'll break down the different components.
import React, { useState, useEffect } from "react";import TrackList from "../components/TrackList";import Instructions from "../components/Instructions";import SplashScreen from "../components/SplashScreen";import Mixtape from "../components/Mixtape";import { Network, Alchemy } from "alchemy-sdk";import SearchQueries from "../components/SearchQueries";import { sdk } from "@audius/sdk";const Mix = () => { const [tracks, setTracks] = useState([]); const [playlistTracks, setPlaylistTracks] = useState([]); const ASYNC_MUSIC_CONTRACT = "0xbc402bed62c90afd0e104be32bdee9447b5ccd0d"; const alchemySettings = { apiKey: "", // Replace with your Alchemy API Key. network: Network.ETH_MAINNET, }; const alchemy = new Alchemy(alchemySettings); /** * Helper function to search NFT traits * @param {*} traits The list of traits to search * @param {*} searchKey The search term to look for * @returns */ const getValueForTraitType = (traits, searchKey) => { for (let i = 0; i < traits.length; i++) { if (traits[i].trait_type === searchKey) return traits[i].value; } return ""; }; /** * Searches Audius using Audius API and returns maxTracks. * There is no guarantee that subsequent calls will return the same dataset * I've intentionally coded in a bunch of randomness. * @param {*} tracks Array to hold the found tracks * @param {*} maxTracks Max number of tracks to return */ const doSearchAudius = async (searchType, maxTracks) => { let tracks = []; let audiusTracks; const audiusSdk = sdk({ appName: "Blockmix" }); if (searchType == "trending") { audiusTracks = await audiusSdk.tracks.getTrendingTracks(); } else { audiusTracks = await audiusSdk.tracks.searchTracks({ query: searchType, }); } // then convert the audius data into our cross platform data for (let i = 0; i < audiusTracks.length; i++) { const newTrack = { artwork: audiusTracks[i].artwork["150x150"], artist: audiusTracks[i].user.name, track: audiusTracks[i].title, id: audiusTracks[i].id, playUrl: await audiusSdk.tracks.streamTrack({ trackId: audiusTracks[i].id, }), previewURL: "https://audius.co" + audiusTracks[i].permalink, }; tracks.push(newTrack); } // now randomally delete items from the array until the length is maxTracks while (tracks.length > maxTracks) { const randIndex = Math.floor(Math.random() * tracks.length); tracks.splice(randIndex, 1); } return tracks; }; /** * Searches ASYNC_MUSIC_CONTRACT using Alchmey NFT API and returns maxTracks. * There is no guarantee that subsequent calls will return the same dataset * I've intentionally coded in a bunch of randomness. * @param {*} tracks Array to hold the found tracks * @param {*} maxTracks Max number of tracks to return */ const doSearchAsyncMusic = async (maxTracks) => { let tracks = []; // query the contract for the first 100 NFTs const nftsForContract = await alchemy.nft.getNftsForContract(ASYNC_MUSIC_CONTRACT); // iterate over the list and put data into our JSON format for (let i = 0; i < nftsForContract.nfts.length; i++) { const newTrack = { artwork: nftsForContract.nfts[i].rawMetadata.image, artist: getValueForTraitType(nftsForContract.nfts[i].rawMetadata.attributes, "Artist"), track: nftsForContract.nfts[i].title, id: nftsForContract.nfts[i].tokenId, playUrl: nftsForContract.nfts[i].rawMetadata.animation_url, previewURL: nftsForContract.nfts[i].rawMetadata.external_url, }; tracks.push(newTrack); } // now randomally delete items from the array until the length is maxTracks while (tracks.length > maxTracks) { const randIndex = Math.floor(Math.random() * tracks.length); tracks.splice(randIndex, 1); } return tracks; }; /** * Called when the user clicks a search term. * @param {*} searchType The search option (genre selection) */ const doSearch = async (searchType) => { setTracks([]); let tracks = []; const maxTracks = 15; // limit number of tracks per data source const audiusTracks = await doSearchAudius(searchType, maxTracks); const asyncTracks = await doSearchAsyncMusic(maxTracks); tracks = audiusTracks.concat(asyncTracks); // now randomize the track list for (var i = tracks.length - 1; i > 0; i--) { var j = Math.floor(Math.random() * (i + 1)); var temp = tracks[i]; tracks[i] = tracks[j]; tracks[j] = temp; } setTracks(tracks); }; return ( <div className="w-full h-full min-h-full pt-20"> <div className="flex flex-col"> <div className=""> <span className="text-4xl font-press-start"></span> </div> {tracks.length === 0 && ( <div className="mt-5"> <SplashScreen /> </div> )} <SearchQueries doSearch={doSearch} /> {playlistTracks.length > 0 && ( <Mixtape playlistTracks={playlistTracks} setPlaylistTracks={setPlaylistTracks} /> )} <div className="px-4 max-w-full"> {tracks.length > 0 && ( <TrackList tracks={tracks} playlistTracks={playlistTracks} setPlaylistTracks={setPlaylistTracks} /> )} </div> </div> </div> );};export default Mix;All the logic on this page is dedicated to searching, first we search Audius, then we search with the Alchemy SDK, then we merge the results and finally send to the <TrackList /> component to display.
Start first with the doSearch() function on line 116. This function sets a max number of tracks per data source at 15, then calls sub-search functions for each data source. If you wanted to expand on this project and allow searching of additional contracts, this is where you'd put all your logic. Finally we randomize the track list so that the same items aren't always appearing at the top. If you did want to create a traditional search engine, you could easily remove the randomness.
Audius Search
The Audius SDK makes it crazy easy to search for tracks. We simply:
- Connect to the SDK.
const audiusSdk = sdk({ appName: "Blockmix" });
- Search either with a search term or request trending tracks.
if (searchType == "trending") {
    audiusTracks = await audiusSdk.tracks.getTrendingTracks();
} else {
    audiusTracks = await audiusSdk.tracks.searchTracks({
        query: searchType,
    });
}
- Then we take the resulting data and put it into the cross-contract JSON format we defined for this project.
for (let i = 0; i < audiusTracks.length; i++) {
    const newTrack = {
        artwork: audiusTracks[i].artwork["150x150"],
        artist: audiusTracks[i].user.name,
        track: audiusTracks[i].title,
        id: audiusTracks[i].id,
        playUrl: await audiusSdk.tracks.streamTrack({
            trackId: audiusTracks[i].id,
        }),
        previewURL: "https://audius.co" + audiusTracks[i].permalink,
    };
    tracks.push(newTrack);
}
Alchemy SDK Search
The search using the Alchmey SDK is similar, and it's also the code that will be most reusable. The Alchemy SDK makes is very easy to query metadata for different NFT projects, which means you can easily add newer contracts simply by changing the contract address. You can even make this project cross-chain by using contract addresses from different blockchains.
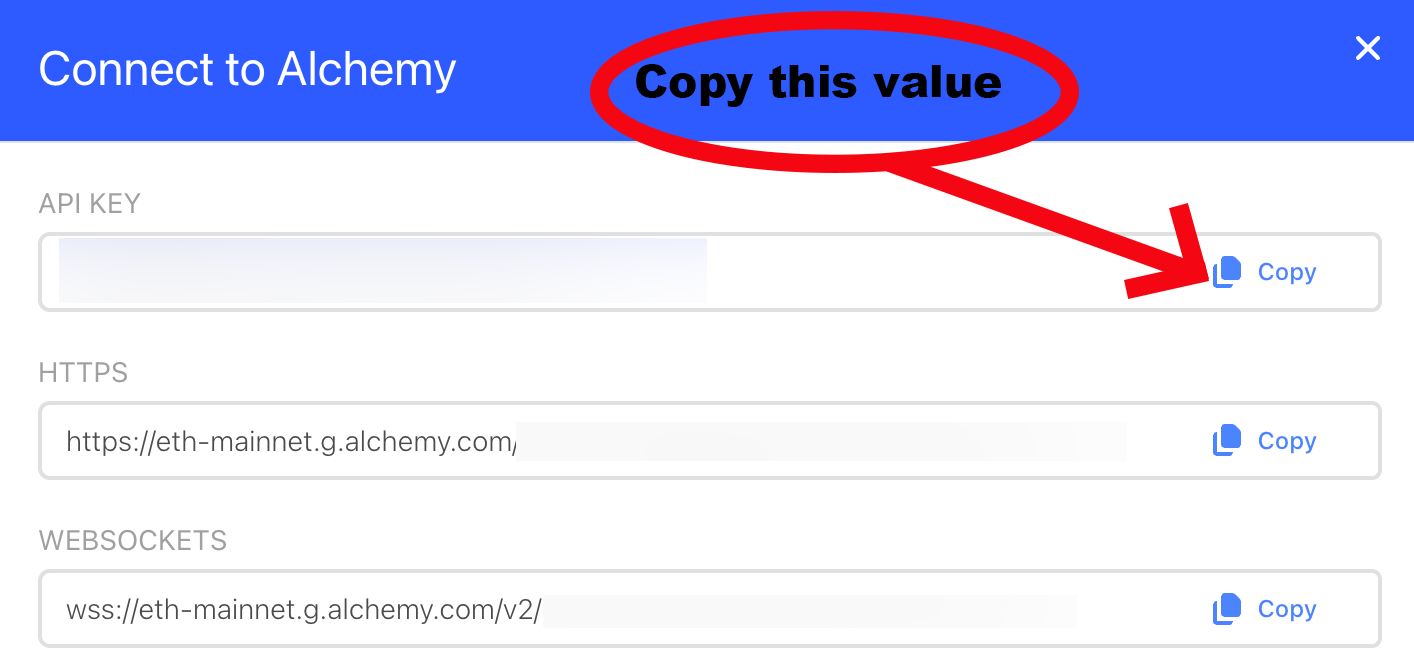
The Alchemy SDK requires a unique API key, so head on over to here and click "Get Started".. You'll need to create an account, then create an app on the Ethereum chain and finally click the "View Key" button. You'll see a screen similar to this, I've blurred my own key though.
Working with the Alchemy SDK we
- Call
getNftsForContract()which returns the NFTs associated with the Async Music Blueprints contract. This call returns the first 100, of which we'll pick 15 random ones.
const nftsForContract = await alchemy.nft.getNftsForContract(ASYNC_MUSIC_CONTRACT);
- Iterate over the dataset, massaging the data into our cross-contract format.
for (let i = 0; i < nftsForContract.nfts.length; i++) {
    const newTrack = {
        artwork: nftsForContract.nfts[i].rawMetadata.image,
        artist: getValueForTraitType(nftsForContract.nfts[i].rawMetadata.attributes, "Artist"),
        track: nftsForContract.nfts[i].title,
        id: nftsForContract.nfts[i].tokenId,
        playUrl: nftsForContract.nfts[i].rawMetadata.animation_url,
        previewURL: nftsForContract.nfts[i].rawMetadata.external_url,
    };
    tracks.push(newTrack);
}
This is the bulk of our search logic, but to make things really work we'll need to code two more components.
SearchQueries.js
<SearchQueries /> A dynamic list of music genres people can search with. To again add more randomness, I defined 22 possible queries, but only show 12 at once. Each time the component re-renders, it picks a different set of search terms to display.


components/SearchQueries.js
import React, { useState, useEffect } from "react";const SearchQueries = ({ doSearch }) => { const [searchQueries, setSearchQueries] = useState([]); const shuffleQueries = () => { const baseQueries = [ "house", "ambient", "pop", "folk", "disco", "jazz", "hip hop", "trap", "experimental", "lofi", "metal", "electronic", "punk", "world", "classical", "country", "latin", "hyperpop", "house", "tropical house", "moombahton", "trending", ]; // randomize the list and then only show the first 12 for (var i = baseQueries.length - 1; i > 0; i--) { var j = Math.floor(Math.random() * (i + 1)); var temp = baseQueries[i]; baseQueries[i] = baseQueries[j]; baseQueries[j] = temp; } setSearchQueries(baseQueries.slice(0, 12)); }; useEffect(() => { // shuffle the queries to give our UI some randomness shuffleQueries(); }, []); return ( <div className="border bg-secondary border-primary border-8 mx-20 mt-5"> <div> <div className="flex flex-row items-center pr-10"> {searchQueries.map((query, id) => ( <div className="px-1" key={id}> <button type="button" className="font-mono mt-3 mb-3 rounded border border-gray-300 bg-white px-2.5 py-1.5 text-xs font-medium text-text shadow-sm hover:bg-highlight focus:outline-none focus:ring-2 focus:ring-indigo-500 focus:ring-offset-2" onClick={(e) => { doSearch(query); }} > {query} </button> </div> ))} </div> </div> </div> );};export default SearchQueries;TrackList.js
And then type this into components/TrackList.js where we actually list out the tracks in an HTML table.
import React, { useState } from "react";const TrackList = ({ tracks, playlistTracks, setPlaylistTracks }) => { const [activeAudio, setActiveAudio] = useState(); const [activeAudioURL, setActiveAudioURL] = useState(); // called when the user clicks "Add" const doAdd = (track) => { setPlaylistTracks([...playlistTracks, track]); }; // called when the user clicks "Play" const doPlay = async (url) => { if (activeAudio) { activeAudio.pause(); setActiveAudio(null); return; } const audio = new Audio(url); audio.play(); setActiveAudio(audio); setActiveAudioURL(url); }; return ( <div className="mt-8 flex flex-col mx-20"> <div className="-my-2 -mx-4 overflow-x-auto sm:-mx-6 lg:-mx-8"> <div className="inline-block min-w-full py-2 align-middle"> <div className="overflow-hidden shadow ring-1 ring-black ring-opacity-5"> <table className="min-w-full divide-y divide-secondary"> <thead className="bg-secondary"> <tr> <th scope="col" className="font-mono py-3.5 pl-4 pr-3 text-left font-semibold text-gray-900 sm:pl-6" ></th> <th scope="col" className="font-mono px-3 py-3.5 text-left font-semibold text-gray-900" > Artist </th> <th scope="col" className="font-mono px-3 py-3.5 text-left font-semibold text-gray-900" > Title </th> <th scope="col" className="relative py-3.5 pl-3 pr-4 sm:pr-6"></th> </tr> </thead> <tbody className="divide-y divide-secondary bg-primary "> {tracks.map((track) => ( <tr key={track.id}> <td className="whitespace-wrap py-4 pl-4 pr-3 sm:pl-6"> <div className="flex items-center"> <div className="h-10 w-10 flex-shrink-0"> <img className="h-10 w-10 rounded-full" src={track.artwork} alt="" /> </div> </div> </td> <td className="whitespace-wrap px-3 py-4 text-gray-500"> <div className="font-mono text-sm text-gray-900"> {track.artist} </div> </td> <td className="whitespace-wrap px-3 py-4 text-gray-500"> <span className="font-mono text-sm whitespace-wrap px-3 py-4 text-white"> {track.track} </span> </td> <td className="relative whitespace-wrap py-4 pl-3 pr-4 text-right font-medium sm:pr-6"> {activeAudio && activeAudioURL == track.playUrl && ( <a href="#" className="font-mono text-xs mt-3 mb-3 mr-3 rounded border border-gray-300 bg-white px-2.5 py-1.5 text-xs font-medium text-gray-700 shadow-sm hover:bg-highlight focus:outline-none focus:ring-2 focus:ring-indigo-500 focus:ring-offset-2" onClick={(e) => { doPlay(track.playUrl); }} > Pause </a> )} {!activeAudio && ( <a href="#" className="font-mono text-sm mt-3 mb-3 mr-3 rounded border border-gray-300 bg-white px-2.5 py-1.5 text-xs font-medium text-gray-700 shadow-sm hover:bg-highlight focus:outline-none focus:ring-2 focus:ring-indigo-500 focus:ring-offset-2" onClick={(e) => { doPlay(track.playUrl); }} > Play </a> )} <a href="#" className="font-mono text-sm mt-3 mb-3 rounded border border-gray-300 bg-white px-2.5 py-1.5 text-xs font-medium text-gray-700 shadow-sm hover:bg-highlight focus:outline-none focus:ring-2 focus:ring-indigo-500 focus:ring-offset-2" onClick={(e) => { doAdd(track); }} > Add </a> </td> </tr> ))} </tbody> </table> </div> </div> </div> </div> );};export default TrackList;SplashScreen.js
Type this into components/SplashScreen.js. It's just some simple 90s graphics to show when there's no search results.
import React from "react";import boomBox from "../assets/images/blue-pink-boom-box.png";// using assets from https://www.vecteezy.com/vector-art/11739286-90s-80s-memphis-nostalgic-colorful-retro-objects-toysconst SplashScreen = () => { return ( <div className="w-full flex flex-row justify-center"> <img src={boomBox} alt="90s boom box" /> </div> );};export default SplashScreen;Mixtape.js
Ok, here's the last component of our main page, and also the place where we'll be (finally) interacting with the Bundlr SDK.
import React, { useState, useEffect } from "react";import { WebBundlr } from "@bundlr-network/client";import { useProvider, useSigner } from "wagmi";const Mixtape = ({ playlistTracks, setPlaylistTracks }) => { const [arweaveURL, setArweaveURL] = useState(null); const [playing, setPlaying] = useState(false); const [activeAudioObjects, setActiveAudioObjects] = useState([]); const [playlistTitle, setPlaylistTitle] = useState(""); const rainbowKitProvider = useProvider(); const { data: signer } = useSigner(); const [message, setMessage] = useState(""); const [mixtapeURLs, setMixtapeURLs] = useState([]); useEffect(() => { // read out a local copy of our mixtape urls store in state const localStorageURLs = localStorage.getItem("mixtape-urls"); if (localStorageURLs) { console.log(localStorageURLs.split(",")); setMixtapeURLs(localStorageURLs.split(",")); } else { console.log("No stored mixtapes"); setMixtapeURLs([]); } }, []); /** * Adds the latest playlist URL to the browser's local storage * @param {*} newURL */ const storePlaylistURL = (newURL) => { setMixtapeURLs([...mixtapeURLs, newURL]); // a new URL has been added. store the whole array in local storage. localStorage.setItem("mixtape-urls", [...mixtapeURLs, newURL]); }; // On saving to Bundlr, we take the mixtape template and inject the following values // 1. Mixtape title // 2. JSON object showing audio data // 3. Random tape image const doSave = async () => { if (!playlistTitle) { setMessage("How about a name first?"); return; } // Template URL for the file stored on Arweave // If you uploaded your own template, change this URL. const templateURL = "https://arweave.net/lsjOqRmeBq0nP62WlJt3I6K_yD0CiM9-N8TB1Hfh31g"; // 20 different images to show at the top of the playlist // If you uploaded your own images to Bundlr, change these IDs const tapeImages = [ "Gbg6ST1ntBfYXUhIsjkqlrKDd8PEh7rwh3Y45VGE5Zw", "Z1QxcVwk-mqQiphuA3O0en6sAbk5zrCUny4nniOZujU", "ZRTbKEuUfV7IUy9mZCuMXjsuJ0kwnvqeEFtE_AOr5j0", "mgHl_zr0POZ9dsmzhP75-tU-VTOZavCLywYaHiDv3xw", "yPL1WRjU1jWRIi-jMVthn9LBE9JYT6xzVKl4s6PLYNo", "r1YeNoi5edRbUdw5r4y7EfJcJhctjrxEGBFZOjO8Yts", "UuSavdxKkQd_yzfoaUETvRULGKAGulmwykvxUK9oXAM", "N1hNZi5acUPV4luRzIhtnrLSpjOTO_fewPD2WoSkibs", "UEJMXYmBEkpiM7VLq71dGcIk1hEhSBKmBjYmOzE6PXA", "X1oyZpsslvGjKLjWb5HWU6JIGu3g7cnFiZxr6eCY9Go", "2BRqnvme7rskRh1hh8SE5cxV7skW_WbazyvNI4MUqjI", "2ALajE7LbvLy5VoxRpxDrEOlzyJd97zuEAl_DWfFOWQ", "zgsaseaxqN7UdKcujjQY4f1-9ml2iM0MBYcQLt4FHGU", "SnFB_aZNpSa6_hmsLYCxpL9wFdaKl3qkt4JJTHQng-k", "Gm3oWzFxiVtB2Ls2noT6q_TbgQQx_PwYNBjUJV0tJXg", "kxX9_3P5jokehNSDrGuB5btLPMKt_vB_yUijeYQL-Ro", "45X6FpmwsSVG_ul4TsPBnIkQh7aM2y1CuTNdF0aiaRE", "UVUvrWtxtcjjX4NnbjWvnL7sz06ar3y3aquqDpYxBG4", "bRsly1adnoqj9-5bPznXIfF_M7QcatuuKPCdl9zScq4", "vxyIsS8VWVwWlhKpOx3EBhvT04bAftC_-GmNtsihSkI", ]; // pick a random image const tapeURL = "https://arweave.net/" + tapeImages[Math.floor(Math.random() * tapeImages.length)]; // grab the template data const templateDataFull = await fetch(templateURL); let templateDataText = await templateDataFull.text(); let templateDataMerged = ""; // 1. Change ||TITLE|| to playlistTitle templateDataText = templateDataText.substring(0, templateDataText.indexOf("||TITLE||")) + playlistTitle + templateDataText.substring(templateDataText.indexOf("||TITLE||") + 9); // 1. Change ||IMAGE|| to tapeURL templateDataText = templateDataText.substring(0, templateDataText.indexOf("||IMAGE||")) + tapeURL + templateDataText.substring(templateDataText.indexOf("||IMAGE||") + 9); // 3. Change ||TRACKS|| to the stringified value of our JSON array templateDataText = templateDataText.substring(0, templateDataText.indexOf("||TRACKS||")) + JSON.stringify(playlistTracks) + templateDataText.substring(templateDataText.indexOf("||TRACKS||") + 10); // use function injection to make the RainbowKit provider work with Bundlr rainbowKitProvider.getSigner = () => signer; // const bundlr = new WebBundlr("https://node1.bundlr.network", "matic", rainbowKitProvider); const bundlr = new WebBundlr("https://devnet.bundlr.network", "matic", rainbowKitProvider, { providerUrl: "https://matic-mumbai.chainstacklabs.com", }); await bundlr.ready(); // create a transaction with the merged template data // also set the Content-type value so the browser knows how to render the page const tx = bundlr.createTransaction(templateDataText, { tags: [{ name: "Content-type", value: "text/html" }], }); // lazy fund the upload, only paying for the amount of data we need const cost = await bundlr.getPrice(tx.size); const balance = await bundlr.getLoadedBalance(); // if necessary, fund the upload if (cost.isGreaterThan(balance)) { const fundAmountConverted = cost.minus(balance); console.log("funding ", fundAmountConverted.toString()); await bundlr.fund(fundAmountConverted); } await tx.sign(); const response = await tx.upload(); // print the playlist URL to console for reference console.log(`Data uploaded ==> https://arweave.net/${response.id}`); // store the playlist url locally storePlaylistURL("https://arweave.net/" + response.id); // redirect to play page window.location.href = "/play"; }; /** * Called when the user clicks Play at the mixtape level. * Iterates though the array of tracks, playing each one. * If already playing, pauses play. */ const doPlay = async () => { // if we're already playing, just pause and return if (playing) { for (let i = 0; i < activeAudioObjects.length; i++) { activeAudioObjects[i].pause(); } // set playing to false setPlaying(false); // clear state setActiveAudioObjects([]); return; } setPlaying(true); // create an array of Audio objects we can play const audioObjects = []; for (let i = 0; i < playlistTracks.length; i++) { console.log("creatnig audio object=", playlistTracks[i].playUrl); const audio = new Audio(playlistTracks[i].playUrl); audioObjects.push(audio); } // store in state to make pausing easy setActiveAudioObjects(audioObjects); // iterate over the tracks, playing each one as you go for (let i = 0; i < audioObjects.length; i++) { console.log("playing track ", i); // start the track audioObjects[i].play(); // check if the song has finished playing while (!audioObjects[i].ended) { // pause 1 second await new Promise((resolve) => setTimeout(resolve, 1000)); } } // done setPlaying(false); }; // removes the specified track from the list const removeFromPlaylist = (id) => { for (let i = 0; i < playlistTracks.length; i++) { if (id === playlistTracks[i].id) { playlistTracks.splice(i, 1); setPlaylistTracks([...playlistTracks]); } } }; return ( <div className="flex flex-col items-end bg-primary mx-20 "> <div className="flex border border-primary border-8 "> {playlistTracks.map((track) => ( <div className="flex flex-col px-1"> <img src={track.artwork} width="150" height="150" /> <span className="text-right text-xs font-mono"> <a href="#" onClick={(e) => removeFromPlaylist(track.id)}> x </a> </span> </div> ))} </div> <div className="flex flex-row w-full items-end justify-end py-1 px-1"> <input type="text" name="mixtapeName" id="mixtapeName" value={playlistTitle} className="self-start mt-3 mr-3 px-1.5 py-0.5 border-highlight focus:border-highlight focus:ring-highlight" placeholder="what's my name?" onChange={(e) => setPlaylistTitle(e.target.value)} /> {playing && ( <button type="button" className="font-mono text-sm bg-secondary mt-3 mr-3 px-2.5 py-1.5 text-xs font-medium text-gray-700 shadow-sm hover:bg-highlight focus:outline-none focus:ring-2 focus:ring-indigo-500 focus:ring-offset-2" onClick={(e) => { doPlay(); }} > pause </button> )} {!playing && ( <button type="button" className="font-mono text-sm mt-3 mr-3 bg-secondary px-2.5 py-1.5 text-xs font-medium text-gray-700 shadow-sm hover:bg-highlight focus:outline-none focus:ring-2 focus:ring-indigo-500 focus:ring-offset-2" onClick={(e) => { doPlay(); }} > play </button> )} {!arweaveURL && ( <button type="button" className="font-mono text-sm mt-3 bg-secondary px-2.5 py-1.5 text-xs font-medium text-gray-700 shadow-sm hover:bg-highlight focus:outline-none focus:ring-2 focus:ring-indigo-500 focus:ring-offset-2" onClick={(e) => { doSave(); }} > save to bundlr </button> )} </div> <p className="font-bold text-white mr-1">{message}</p> </div> );};export default Mixtape;Ok, cool. Let's start with the doSave() function on line 41.
The top of the function is where we define the URL for the template and cassette images uploaded to Bundlr earlier on. If you're using my versions, just leave this code alone. If you decided to create your own look at feel, change these values to the ones you uploaded.
Then, on lines 79 and 80 we load in the template data:
const templateDataFull = await fetch(templateURL);
let templateDataText = await templateDataFull.text();
And inject our mixtape title, track data and image (replacing the tags ||TITLE||, ||TRACKS||, ||IMAGE||).
Next up, use function injection to modity the RainbowKit Provider to work with Bundlr and connect to a Bundlr node. For our app we're connecting to the Bundlr Devnet, I left in a commented out line showing how to connect to the production node though.
// use function injection to make the RainbowKit provider work with Bundlr
rainbowKitProvider.getSigner = () => signer;
// const bundlr = new WebBundlr("https://node1.bundlr.network", "matic", rainbowKitProvider);
const bundlr = new WebBundlr("https://devnet.bundlr.network", "matic", rainbowKitProvider, {
    providerUrl: "https://matic-mumbai.chainstacklabs.com",
});
await bundlr.ready();
When uploading using the WebBundlr class, you can either call bundlr.upload() directly and do the upload in a single step, or break down the transaction into smaller pieces for more fine-grained control. For this example, I've decided to break things down into separate steps as it helps with the lazy-funding process.
When funding a node with Bundlr, you have two funding options:
- Up-front funding: Sending over a chunk of money to cover all future uploads.
- Lazy-funding: Funding exactly what you need for each upload.
The decision about which funding technique to use will depend a lot on your project and the currency you're funding with. Currencies like ETH, SOL and MATIC post almost instantly, so you can fund any way you want. AR takes much longer to post, generally over 30 minutes, so you'll want to fund upfront if you're using it.
Let's dig in. First create a transaction and set its Content-type to "text/html" so the browser can properly render the mixtape.
const tx = bundlr.createTransaction(templateDataText, {
    tags: [{ name: "Content-type", value: "text/html" }],
});
Next, get the cost to upload the file, and the balance we currently have loaded on the Bundlr node we connected to. If our funded balance isn't enough, add a bit more. Finally sign the transaction and upload it to Bundlr. The call to tx.upload() uses await to block until the server returns a value, but that only takes a few milliseconds.
Finally store the playlist URL in the browser's local storage.
// lazy fund the upload, only paying for the amount of data we need
const cost = await bundlr.getPrice(tx.size);
const balance = await bundlr.getLoadedBalance();

// if necessary, fund the upload
if (cost.isGreaterThan(balance)) {
    const fundAmountConverted = cost.minus(balance);
    console.log("funding ", fundAmountConverted.toString());
    await bundlr.fund(fundAmountConverted);
}
await tx.sign();

const response = await tx.upload();
Rock-n-roll! That's the bulk of this project. At this point, you've seen how to pull in data from multiple sources and group it all into a single asset that you then store on Arweave using Bundlr. For this project we're making mixtapes, but you could easily repurpose the code to make just about anything.
Play.js
The page Play.js reads in the URLs to all the mixtapes you've stored in the browser local storage and displays them each in an IFRAME.
import React, { useState, useEffect } from "react";const Play = () => { const [showTracksId, setShowTracksId] = useState(""); const [mixtapeURLs, setMixtapeURLs] = useState([]); const showTracks = (id) => { setShowTracksId(id); }; useEffect(() => { // read out a local copy of our mixtape urls store in state const localStorageURLs = localStorage.getItem("mixtape-urls"); if (localStorageURLs) { console.log(localStorageURLs.split(",")); setMixtapeURLs(localStorageURLs.split(",")); } else { console.log("No stored mixtapes"); setMixtapeURLs([]); } }, []); return ( <div className="w-full h-full min-h-full pt-20 bg-background"> <div className="flex flex-col"> {showTracksId && ( <div className="h-full flex flex-row flex-wrap justify-items-center border bg-primary border-primary border-8 mx-20 mt-5" id="expandedTapeFrame" > <iframe src={showTracksId + "?showTracks=true"} width={910} height={220}></iframe> </div> )} <div className="h-full flex flex-row justify-items-start items-start flex-wrap border bg-primary border-primary border-8 mx-20 mt-5"> {mixtapeURLs.map((mixtape, id) => ( <div id="showShareFrame" className="flex flex-col bg-secondary mr-1"> <span className="text-center text-sm "> <a href="#" className="underline" onClick={() => showTracks(mixtape)}> Show Tracks </a> </span> <iframe src={mixtape} width={310} height={220}></iframe> </div> ))} </div> </div> </div> );};export default Play;How.js
Finally the page How.js has some basic instructions along with links to the project sourcecode and also this tutorials. You can change it, delete it, do whatever you want. It's not necessary for the project to work, but I always feel like adding things like this makes tutorials easier to understand. Plus if you every put this aside and come back to it a month or three later, having some instructions will help you get back up to speed quicker.
import React from "react";import glasses from "../assets/images/3d-glasses.png";import sneakers from "../assets/images/sneakers.png";import tv from "../assets/images/tv.png";import vhs from "../assets/images/vhs.png";import skate from "../assets/images/skate.png";const How = () => { return ( <div className="w-full h-full min-h-full pt-20"> <div className="px-10 py-10"> <div className="flex flex-row items-end bg-primary text-header px-5 py-5"> <img src={sneakers} width="20%" /> <h2 className="text-4xl font-press-start ml-2">Remember Record Bins?</h2> </div> <div className="flex flex-row items-end bg-secondary text-text px-5 py-5"> <h2 className="font-mono ml-2"> This project all started with a trip down memory lane, an afternoon reminiscing about the joys of searching through record bins. In the age of streaming and fine-grained search tools, it's easy to find the exact song you want ... but you also miss out on those random happy accidents that come from searching though record bins. I designed Blockmix to be the anti-search engine. You can search only by pre-defined categories, and that category list is dynamic and changes with each refresh. Then you can combine your picks from that cross-contract / cross-chain search into a single mixtape playlist and listen to it start to finish. <br /> </h2> <img src={vhs} width="20%" /> </div> <div className="flex flex-row items-end bg-background text-text px-5 py-5"> <img src={glasses} width="20%" /> <h2 className="font-mono ml-2"> Then I decided to lean into the whole "happy accidents" feature, and just mix stuff up. With every search, I use the{" "} <a href="https://audius.org/en/api" target="_blank" className="underline decoration-primary" > Audius API </a>{" "} to do a genre search, then I use the{" "} <a href="https://www.alchemy.com/nft-api" target="_blank" className="underline decoration-primary" > Alchemy NFT API </a>{" "} to query the{" "} <a href="https://opensea.io/collection/async-music-blueprints" target="_blank" className="underline decoration-primary" > Async Music Blueprints </a>{" "} contract, and I just mix everything together. </h2> </div> <div className="flex flex-row items-end bg-primary text-text px-5 py-5"> <h2 className="font-mono ml-2"> Mixtapes are saved to the Arweave blockchain via{" "} <a href="https://bundlr.network/" target="_blank" className="underline decoration-secondary" > Bundlr </a> . They're immutable, once made you can't change them, you can't delete them, you can only listen to them. And because they're stored on Arweave, they're guaranteed to be there forever (well at least 200 years). </h2> <img src={skate} width="20%" /> </div> <div className="flex flex-row items-end bg-secondary text-text px-5 py-5"> <img src={tv} width="15%" /> <h2 className="font-mono ml-2"> In allowing you to create mixtapes using multiple audio sources, I'm also addressing another problem with the music NFT space. It's currently very easy to build a lovely collection of songs, but not to easy to listen to them. Nobody wants to have to click play over and over as you listen to songs from different contracts. This app is an example of how easy it is to mix songs from different contracts, I'd be curious to see someone expand on it and pull in data from hundreds of contracts. <ul className="list-disc ml-5 mt-2"> <li> A tutorial on how I built this can be found{" "} <a href="https://docs.bundlr.network/tutorials/mix-tape-dapp#mixtapejs" target="_blank" className="underline decoration-primary" > here </a> .{" "} </li> <li> The source code can be found here{" "} <a href="https://github.com/lukecd/blockmix" target="_blank" className="underline decoration-primary" > here </a> .{" "} </li> <li> The cool 90s graphics are from{" "} <a href="https://www.vecteezy.com/vector-art/11739286-90s-80s-memphis-nostalgic-colorful-retro-objects-toys" target="_blank" className="underline decoration-primary" > here </a> .{" "} </li> </ul> </h2> </div> </div> </div> );};export default How;Conclusion
Super cool! Great job making it this far. How was the coding process? You are done with the main project and should be really proud of yourself.
I recommend getting up, take a break, walking around ... and then come on back for a few more challenges.
Following a tutorial is a great way to learn, but if you want to grok the material, you've got to take things one step futher and add some additional features. How about trying to:
- Adding in social sharing features to let you share your mixtapes online?
- Adding support for more NFT contracts?
- Changing up the UI and give it a different look and feel?